200 Amphoreus Nymphs Found: Complete Honkai: Star Rail Map Guide — Exact Spots, Rewards & Puzzle Solutions
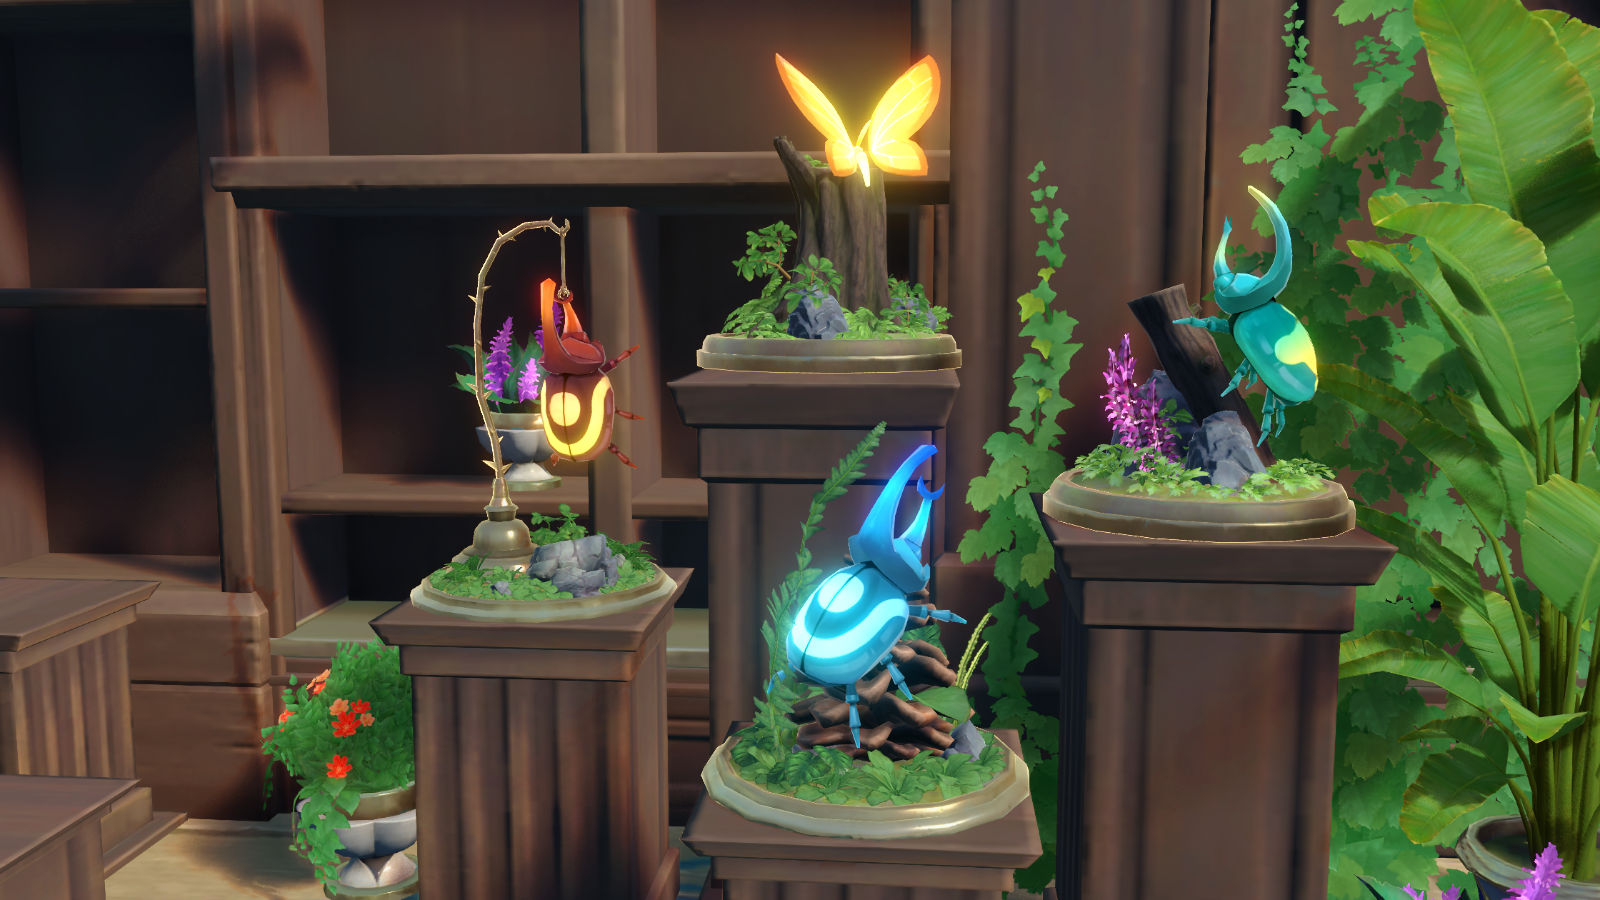
If you’re hunting every Amphoreus nymph in Honkai: Star Rail, this guide lists every critter by map and by spot. Below you’ll find what each nymph looks like, how many are on each map, the rewards, and the extra puzzle you can unlock after collecting them all. Read on, and you’ll save time — plus you’ll get Stellar Jade and Celestial/Disorder Ambrosia along the way.
- Eternal Holy City — Okhema nymph locations
- Bloodbathed Battlefront — Castrum Kremnos nymph locations
- Strife Ruins — Castrum Kremnos nymph locations
- Abyss of Fire — Janusopolis nymph locations
- Sanctum of Prophecy — Janusopolis nymph locations
- Murmuring Woods — Grove of Epiphany nymph locations
- Demigod Council — Dawncloud nymph locations
- Dragonbone City — Styxia nymph locations
- Fortress of Dome / Cloudedge Bastion Ruins — Eye of Twilight nymph locations
- Aedes Elysiae nymph locations
- Warbling Shores — Styxia nymph locations
- Radiant Scarwood — Grove of Epiphany nymph locations
- Universal Matrix — Great Tomb of the Nameless Titan nymph locations
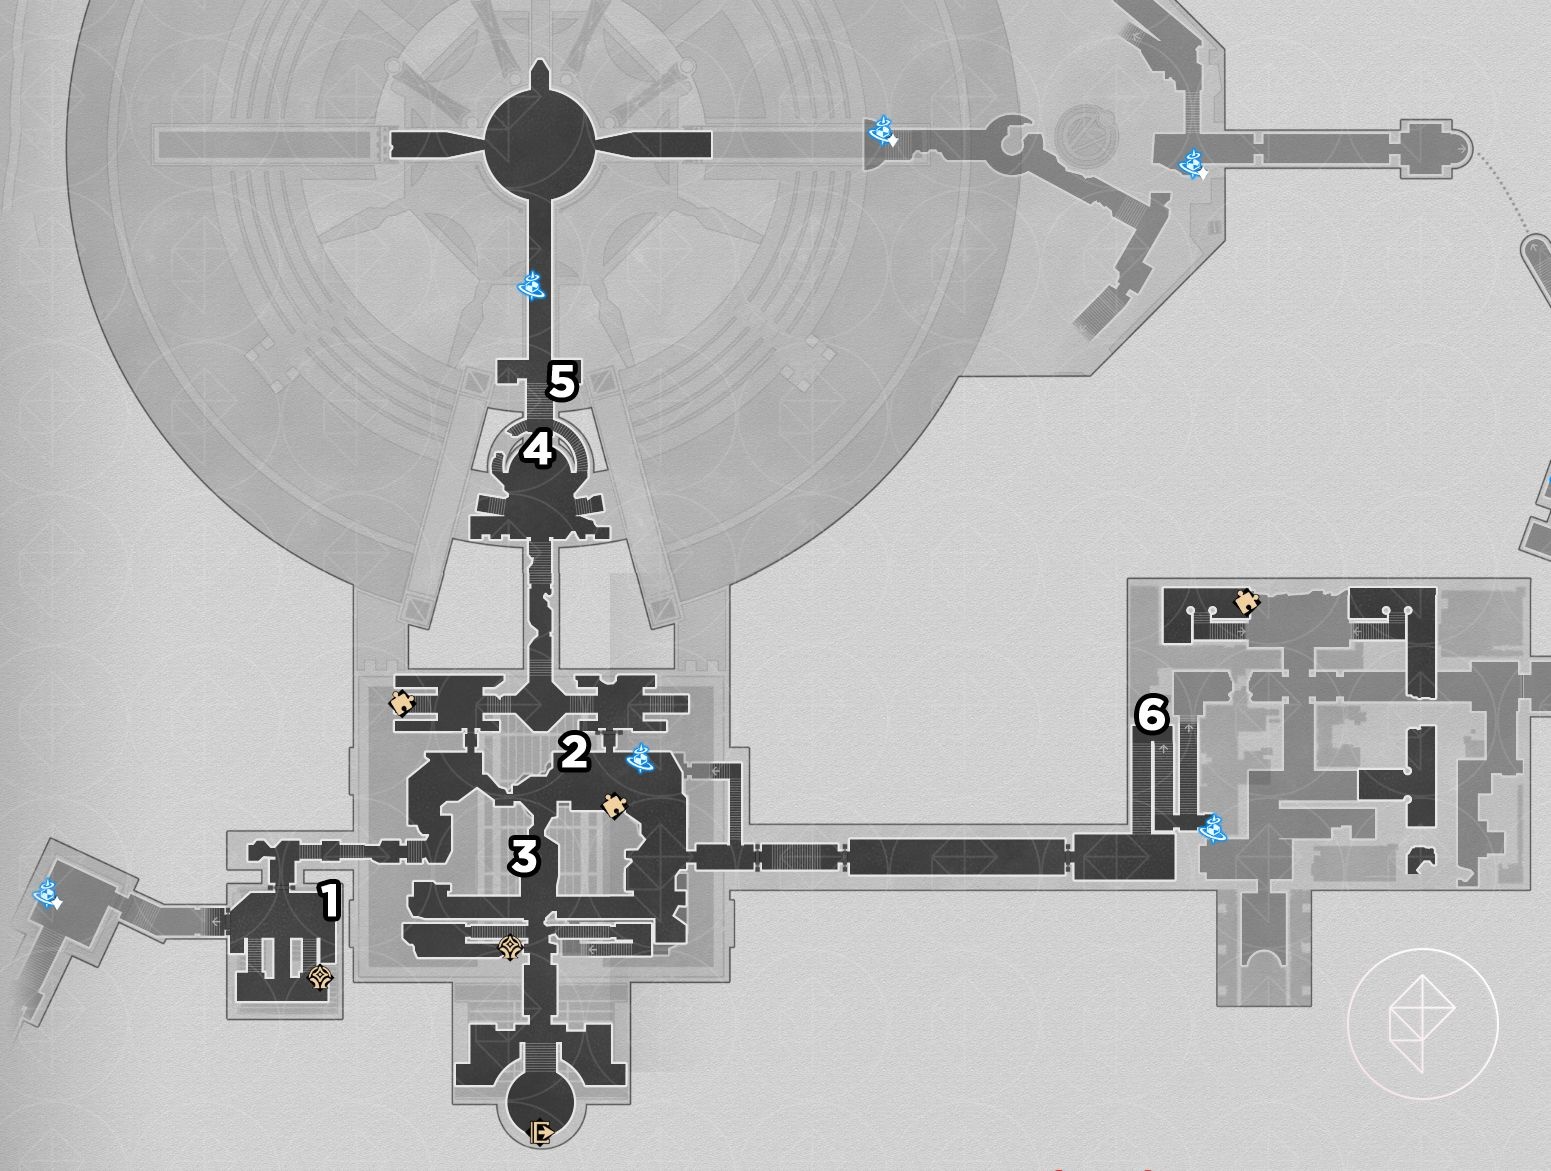
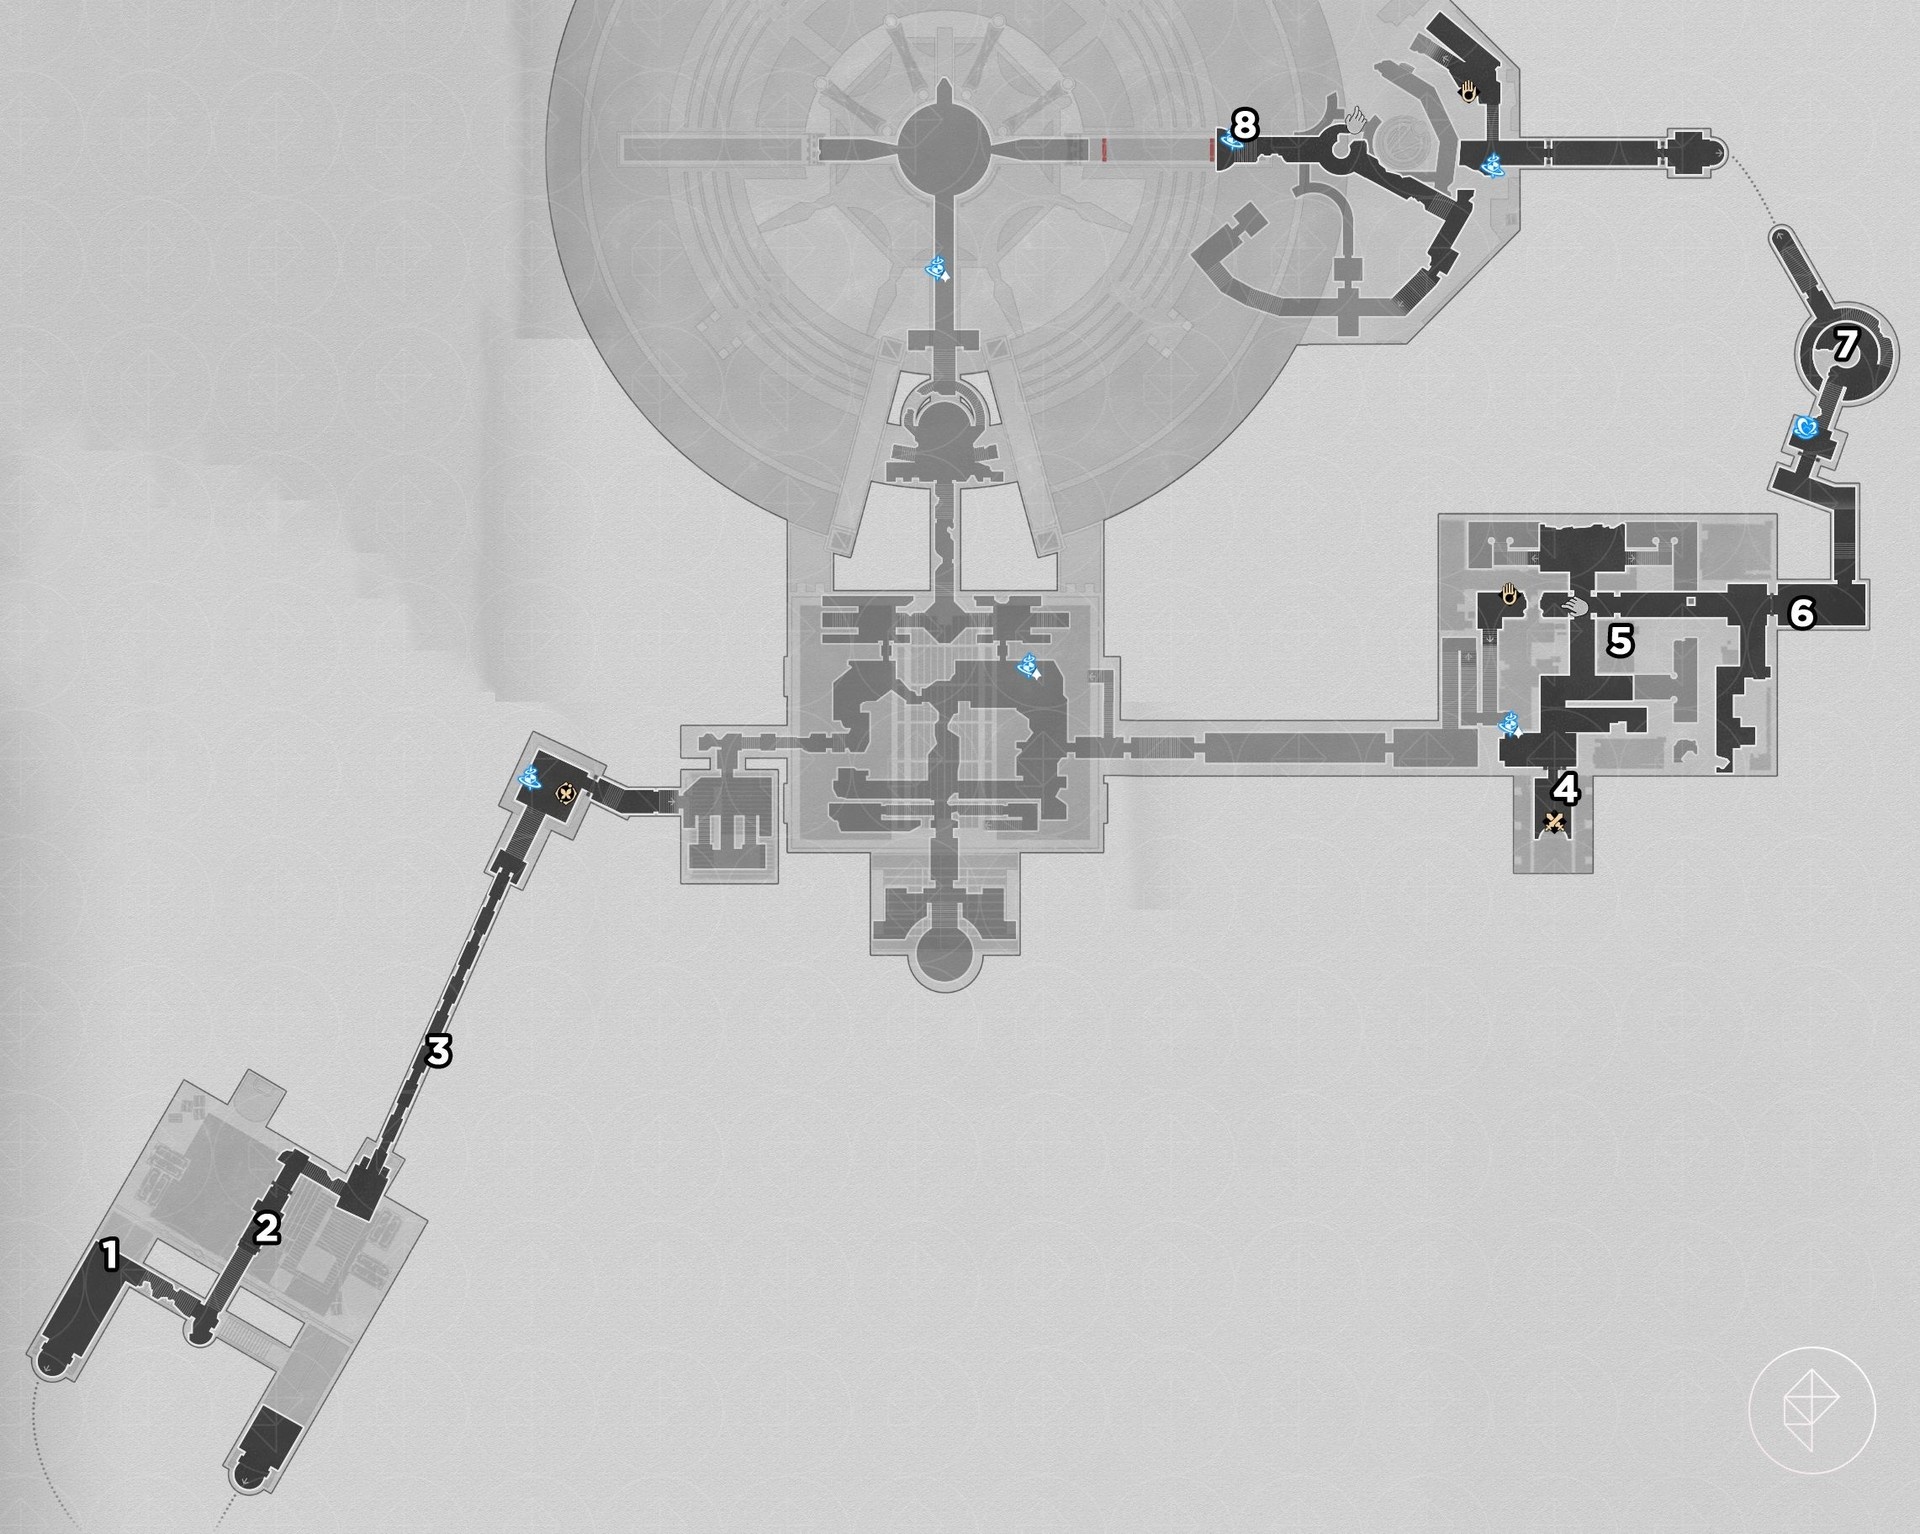
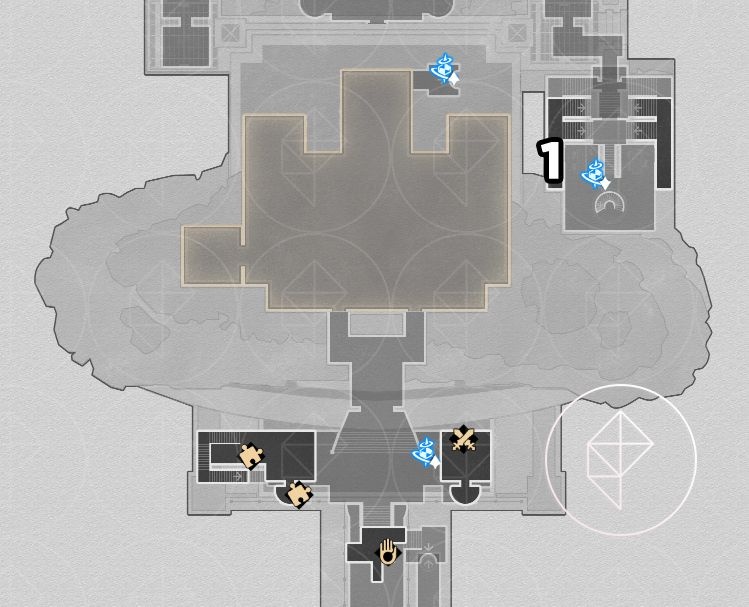
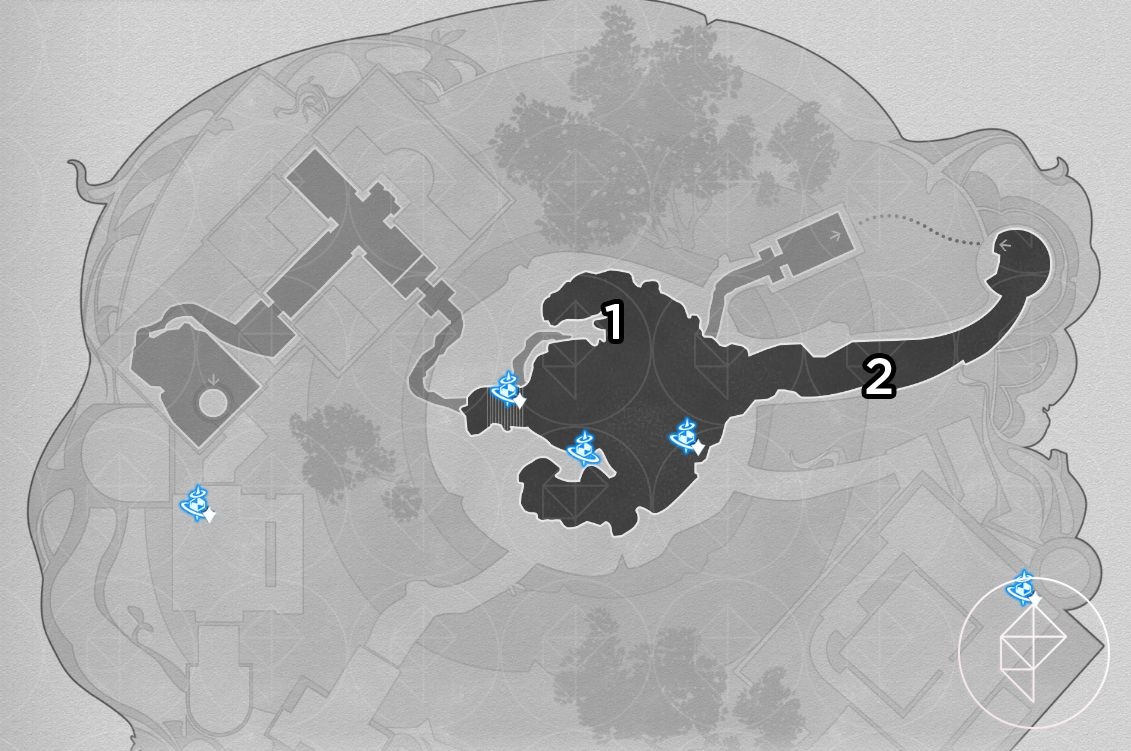
‘Eternal Holy City’ Okhema nymph locations
Okhema has 20 butterfly-like nymphs. After you collect them all you’ll get Stellar Jade, Celestial Ambrosia, and a text from Aglaea telling you to return to the “Garmentmaker.” In addition, a post-collection puzzle using fountains unlocks a precious chest and the achievement “Chirping Secret: Golden Journey.”
Marmoreal Palace F2
- On the “Garmentmaker.”
- On some flowery bushes.
- Blending into the butterfly mural on the wall.
- At the top of the ramp on the curved structure above.

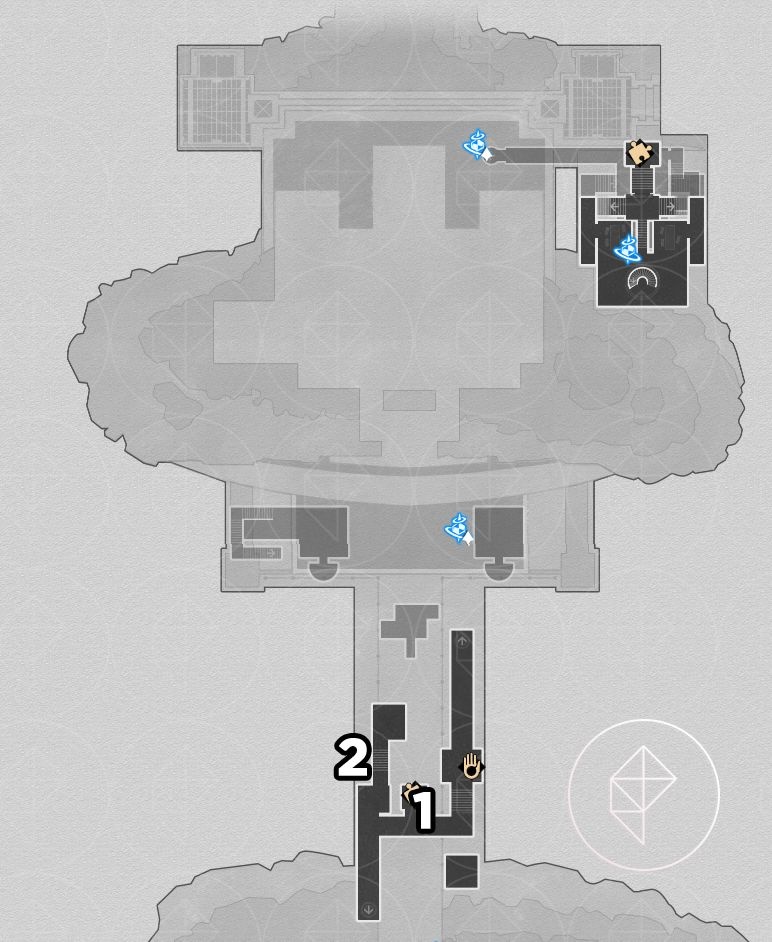
Marmoreal Palace F1
- Laying on the center water fountain.
- Sitting upright on a chair.
- Sleeping in the towels by your bath.
- On the edge of the stage.
- On the potted plant on the table — it flies between pots, so catch it a few times.
- On the walls of the lift — you may need to ride it up and down to collect the final spot.
- Hiding among the stuffed seals on the shelf.
- Flying above the pool.
Marmoreal Market F2
- In the prayer fountain.
- In a basket on the edge of the building.
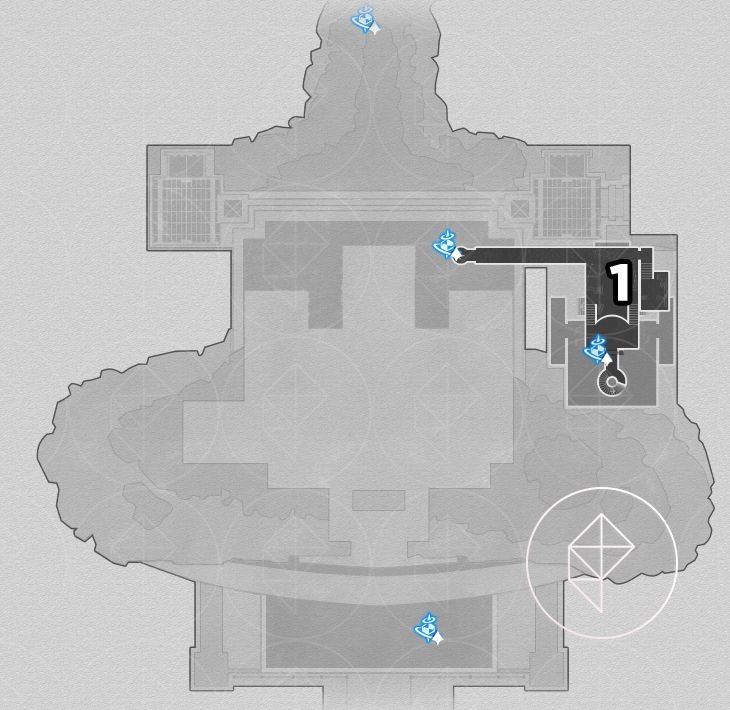
Marmoreal Market F1
- On the golden wall structure.
- On the forge inside the smithy.
- High up on the pillar.
- Inside the dinosaur’s feeder.
- On the guard’s head.
- On the bell at the Droma’s station.
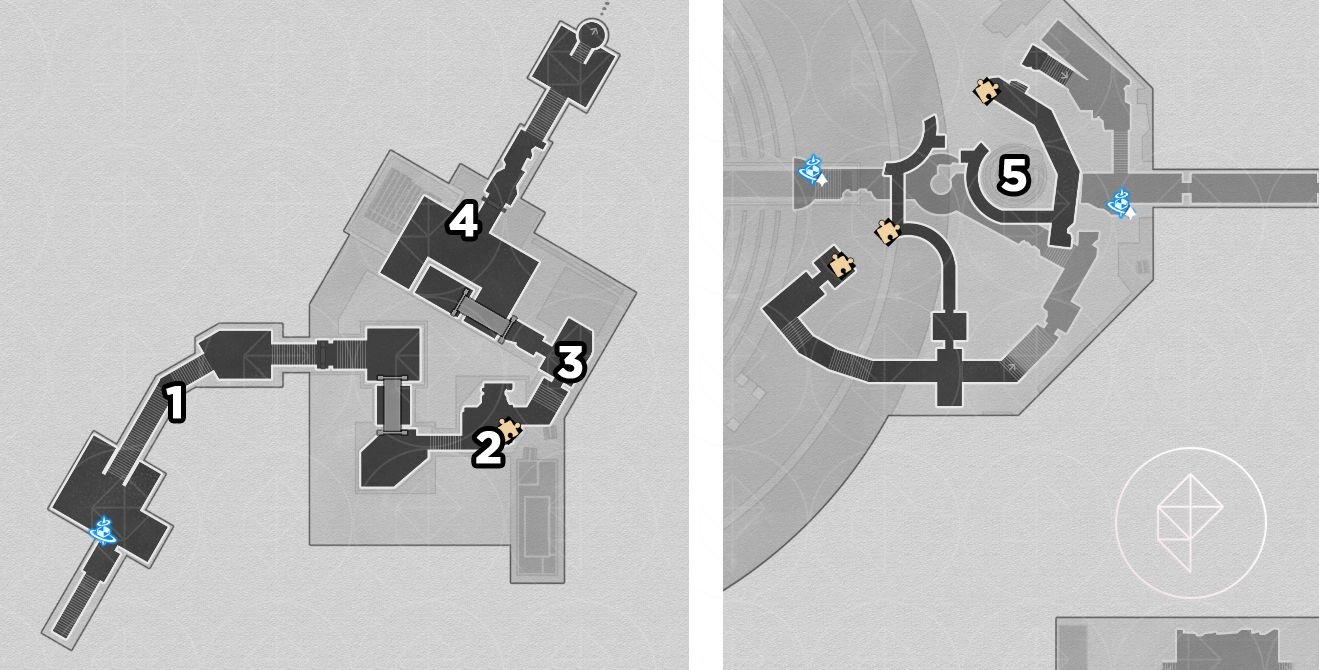
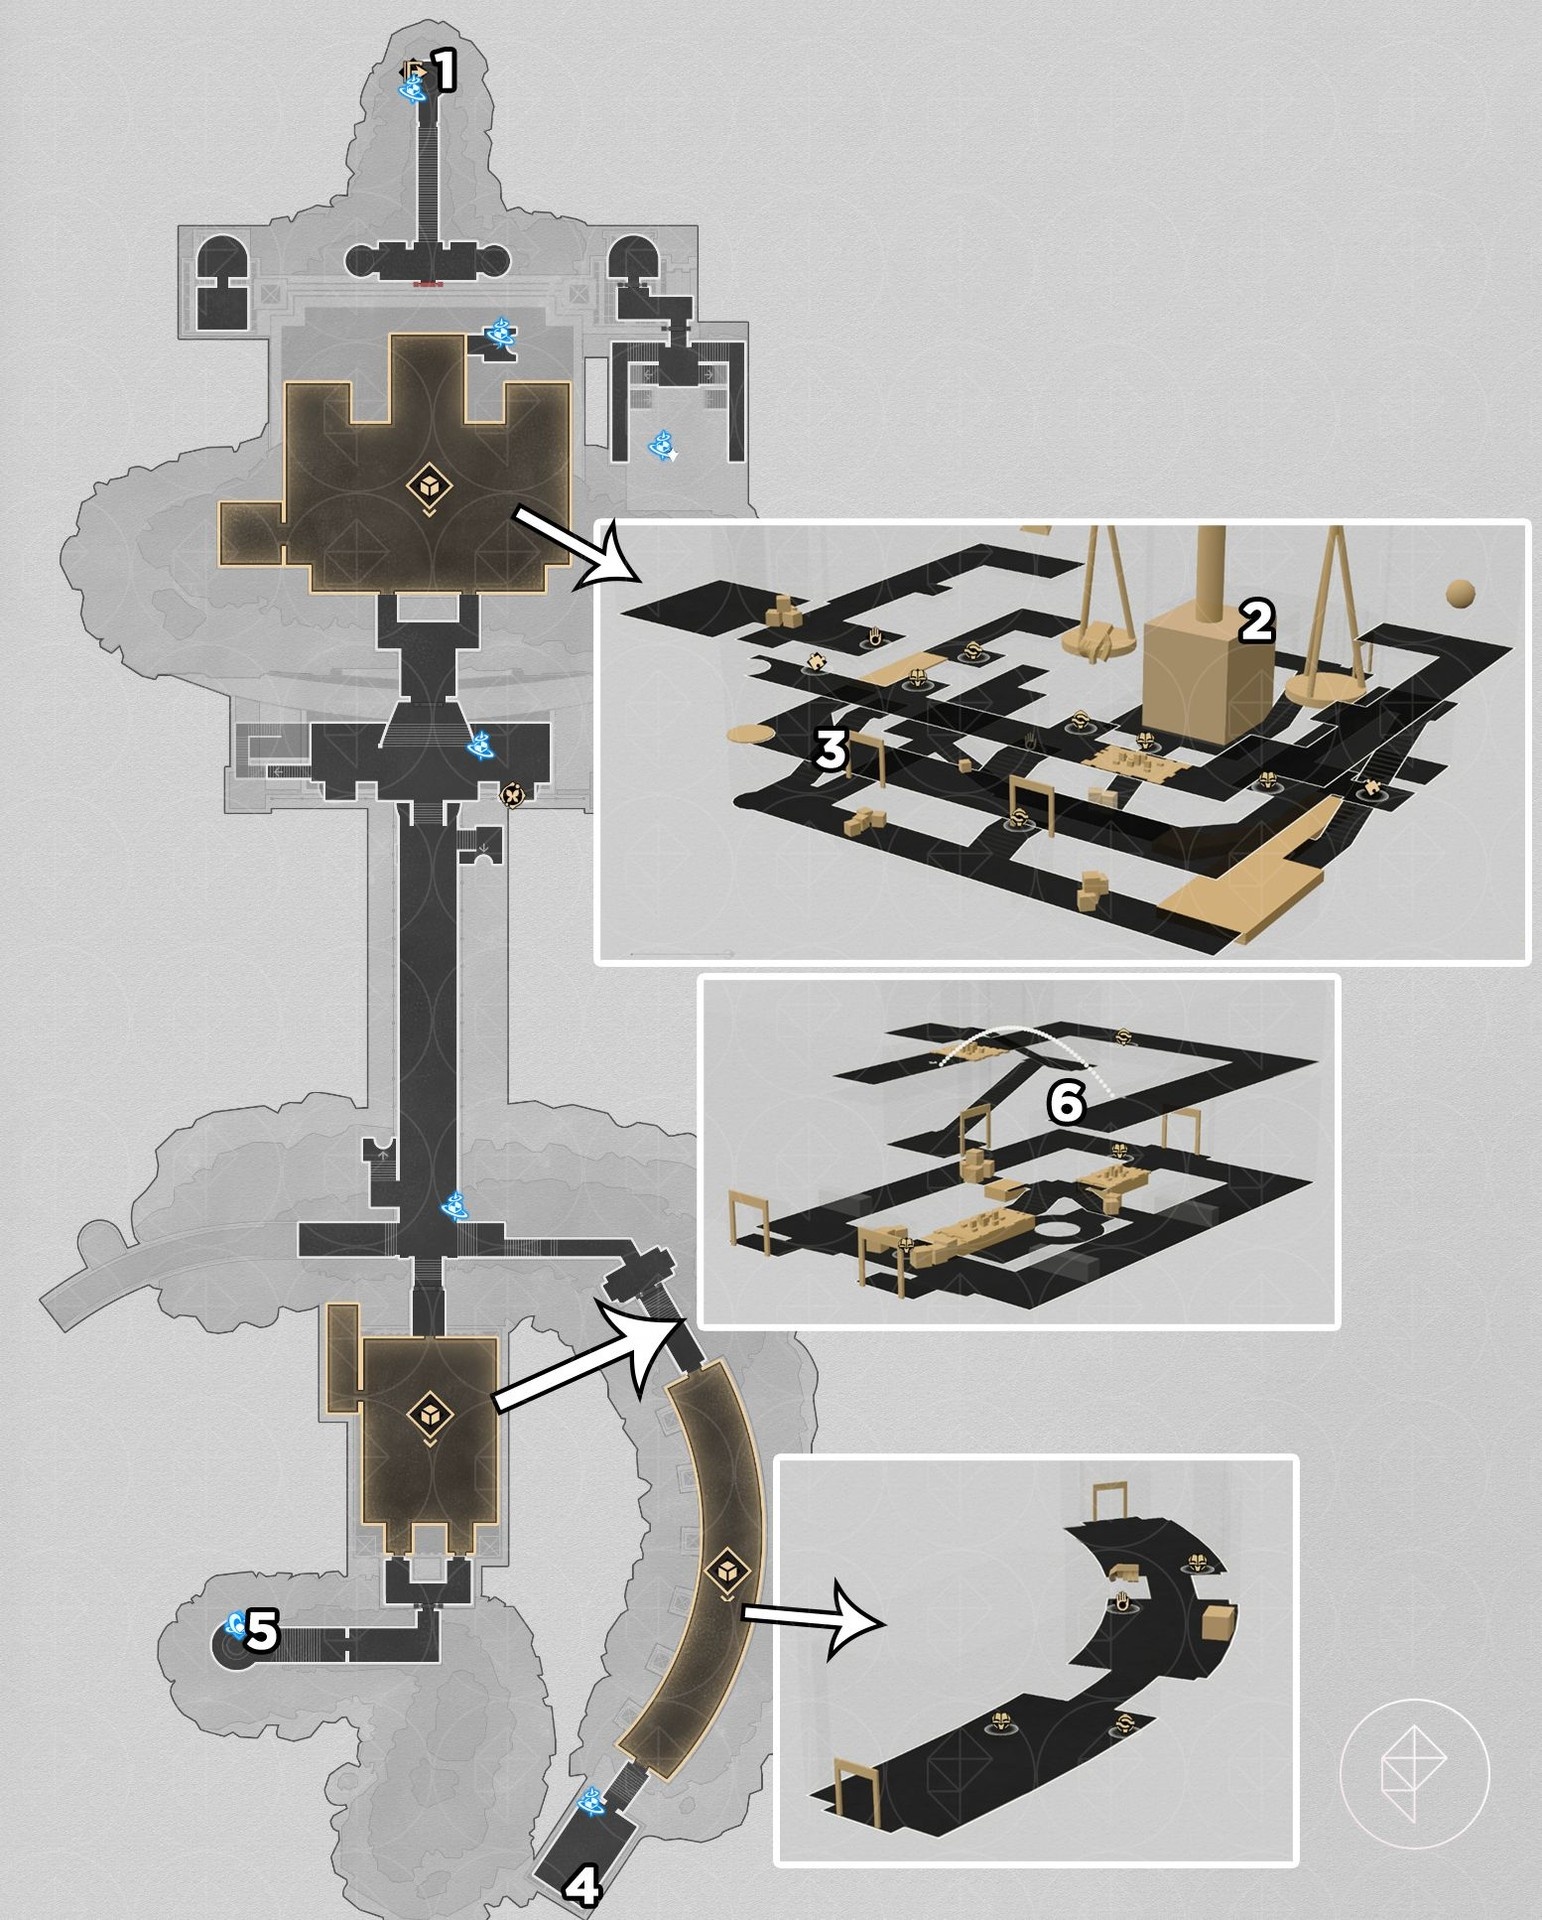
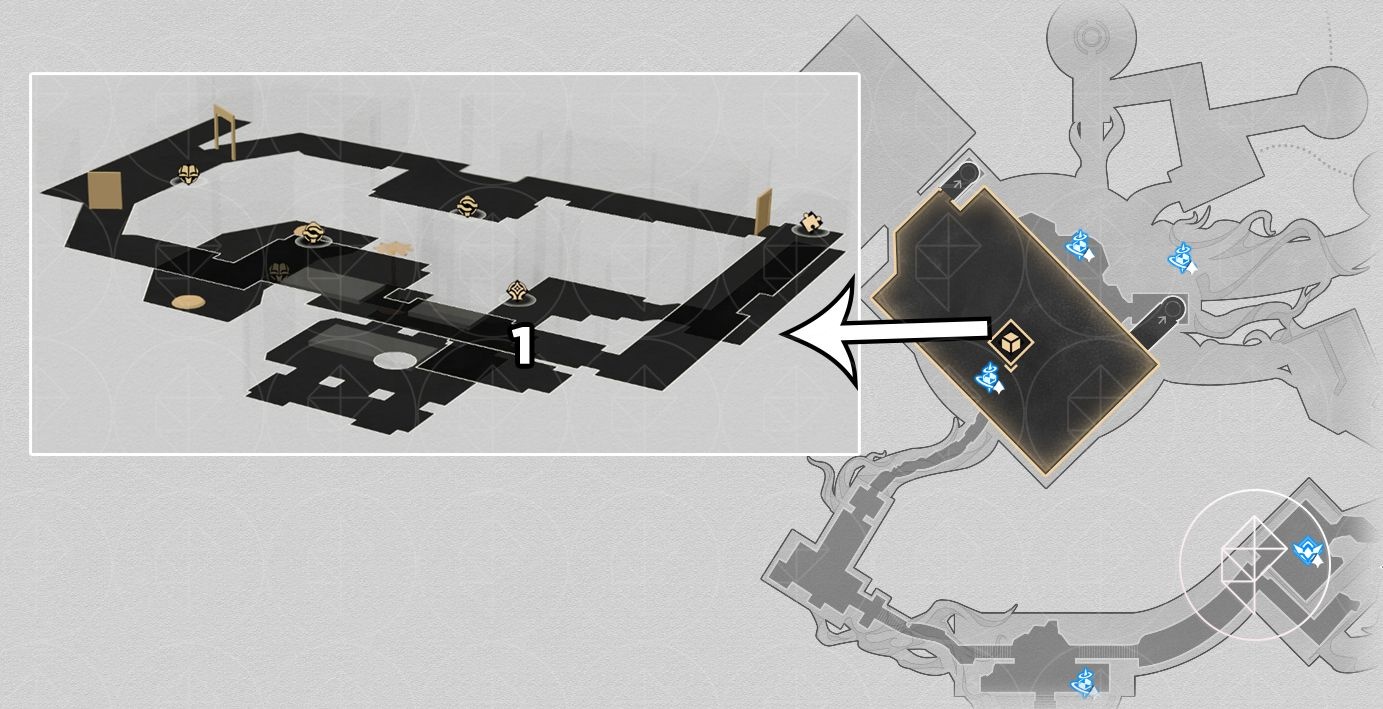
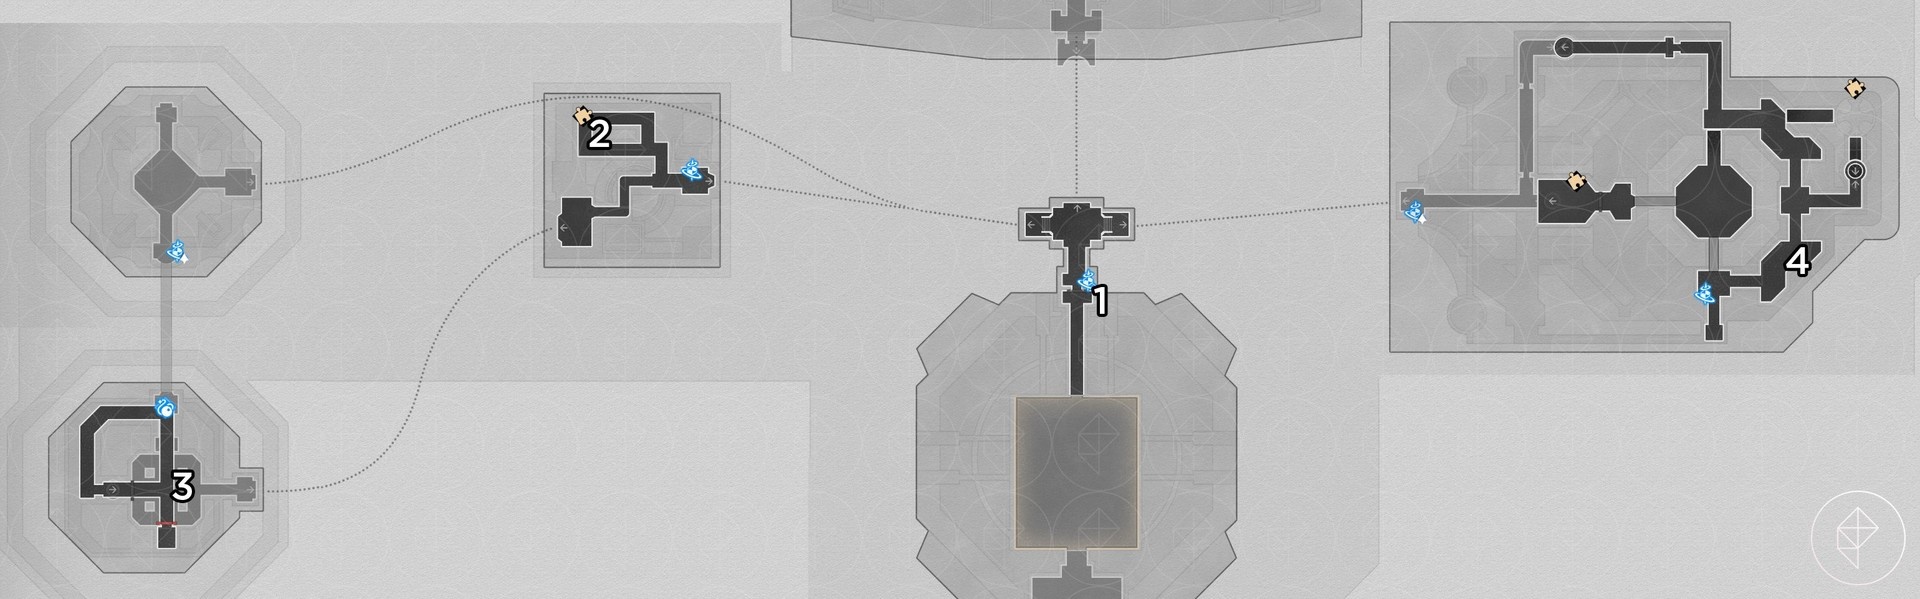
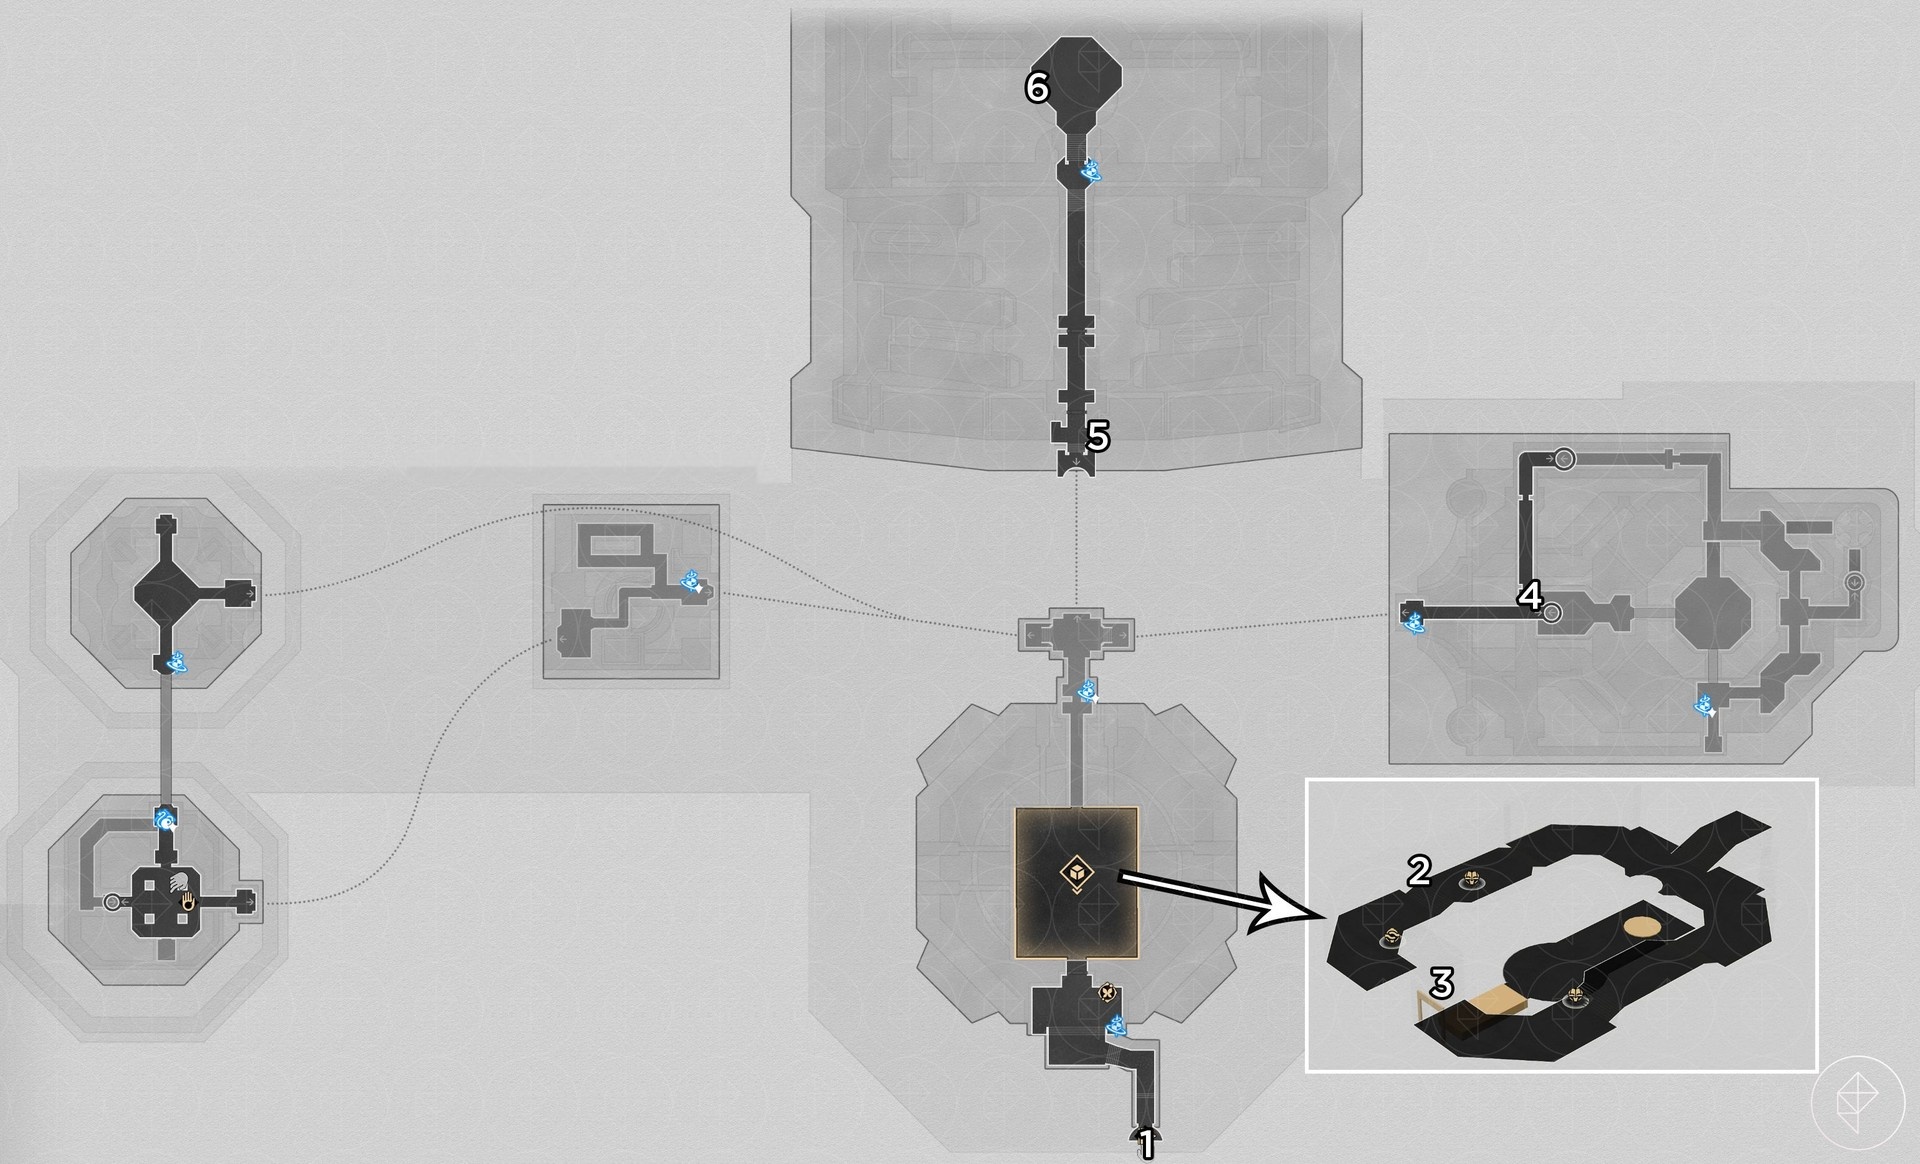
‘Bloodbathed Battlefront’ Castrum Kremnos nymph locations
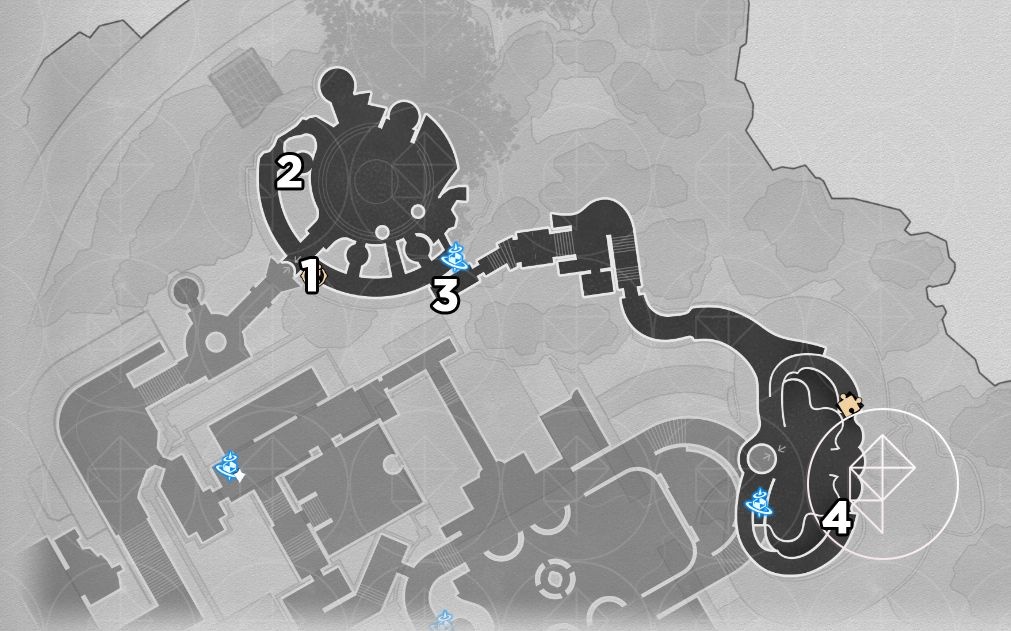
There are 20 red-orange beetle nymphs here. Rewards include Stellar Jade, Celestial Ambrosia, and the key item “Portentous Goldwoven: Bloodbathed Battlefront.” After collecting them, follow the key item hint and stand in the center of the round 3D room on B1 at dawn to trigger the area puzzle. Answer “Four warriors” when prompted to get the chest and the achievement “Chirping Secret: Blemish of Light.”
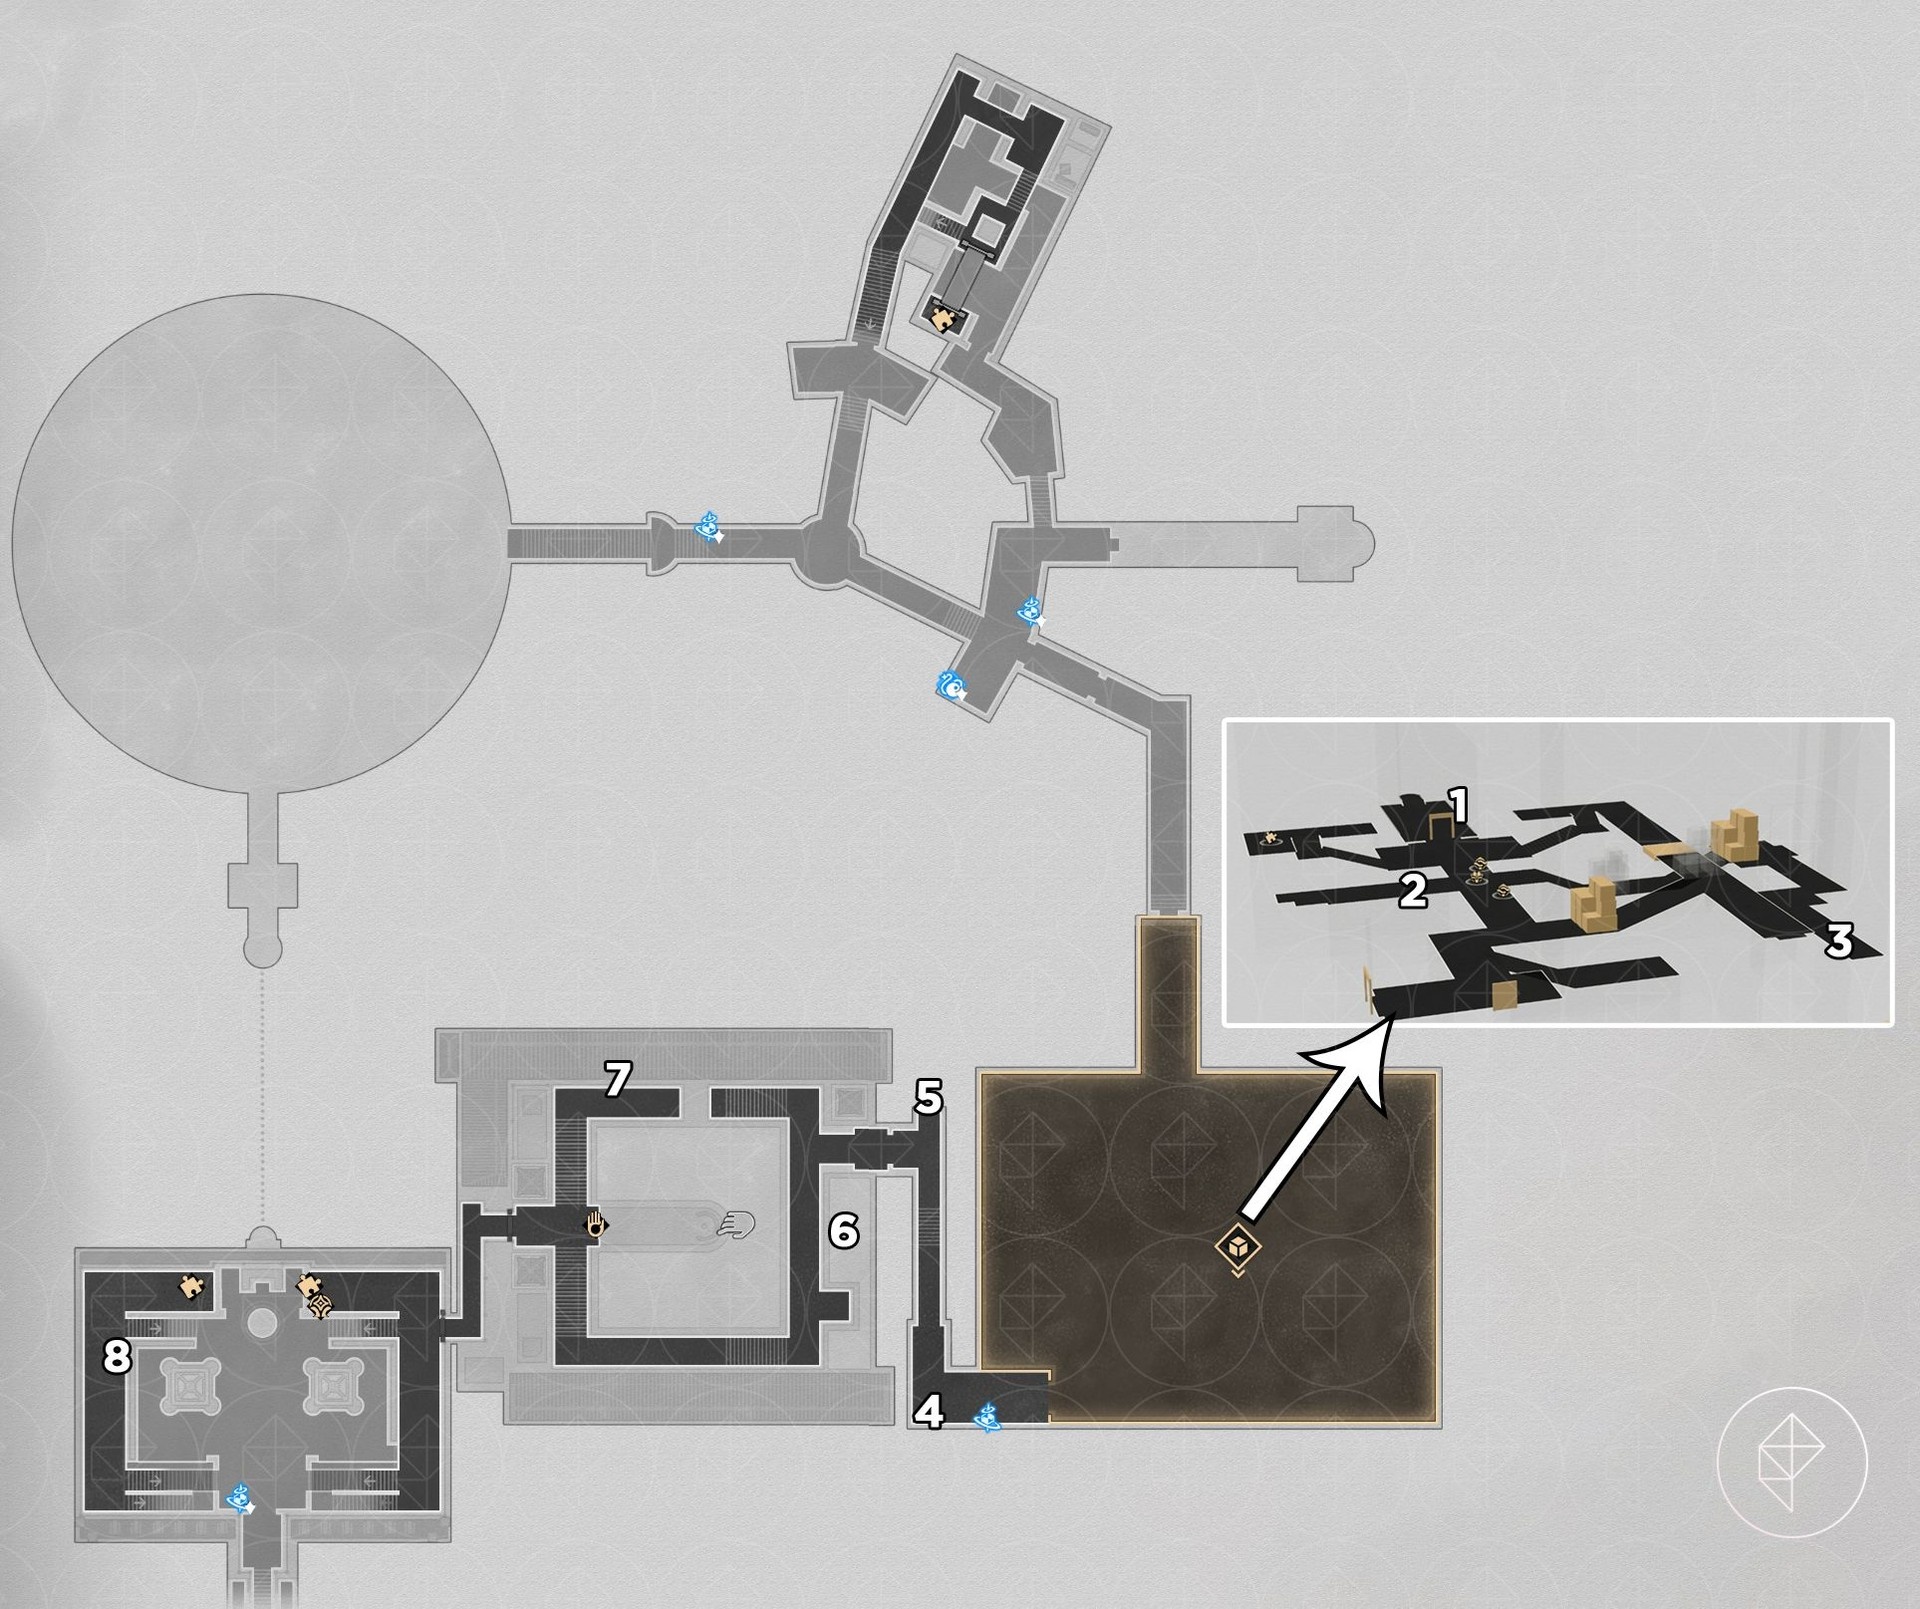
Castrum Kremnos F2
- On the wall in the room with the two enemies.
- On the edge of the walkway (two spots).
- On the wall decor.
- On the walls — ranged attacks on structures can reveal one.
- On top of the large sword structure — use the hand mechanism.
- On the ledge above the pathway.
- On the ground in front of the ball (we counted a squash as a collect, but that may vary).
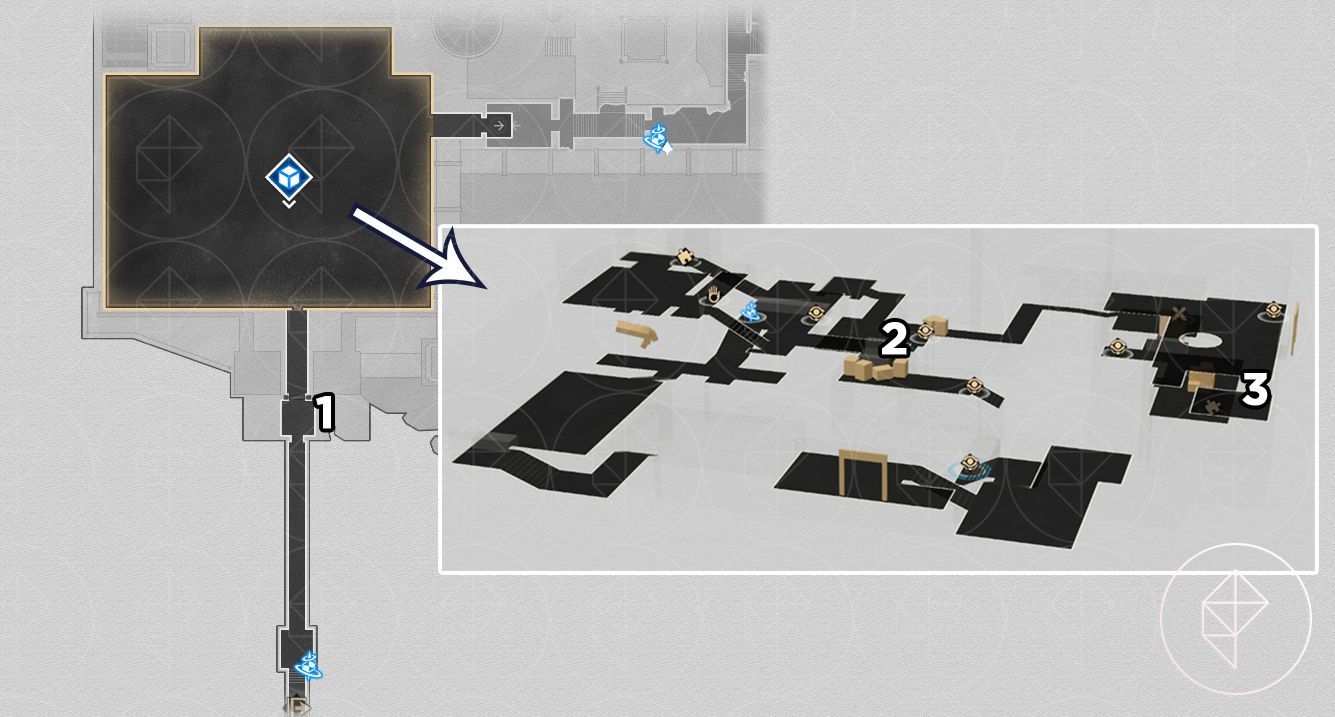
Castrum Kremnos F1
- Behind the doorway to “Strife Ruins.”
- In the fire.
- Rolling a ball up the side of the steps.
- On the edge of the ornamental structure.
- On the pile of blue cubes.
- On the edge of the platform and overlooking the area.
- By the boxes on the ground.
- High up on the wall — a Spirithief may capture it.
Castrum Kremnos B1
- On the curved structure above the path.
- Sitting on the sword of the giant statue — use the floating hand.
- Standing next to the hidden passage machine.
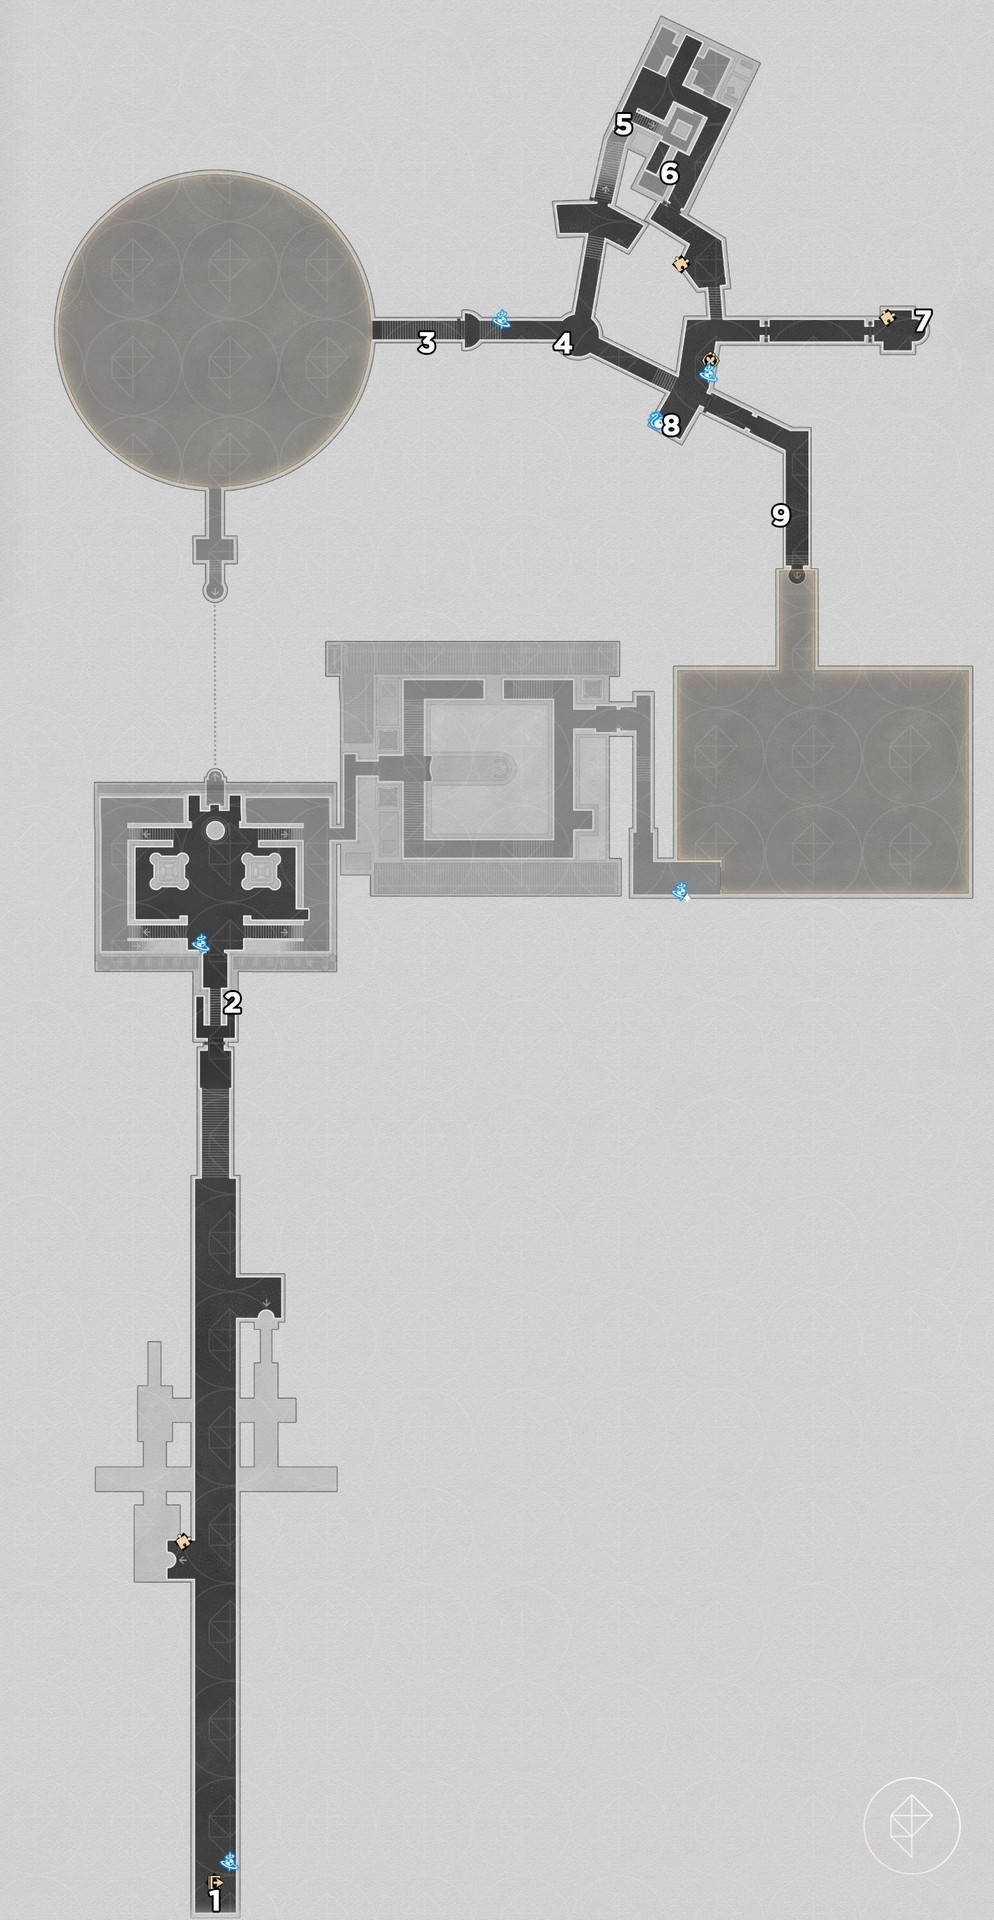
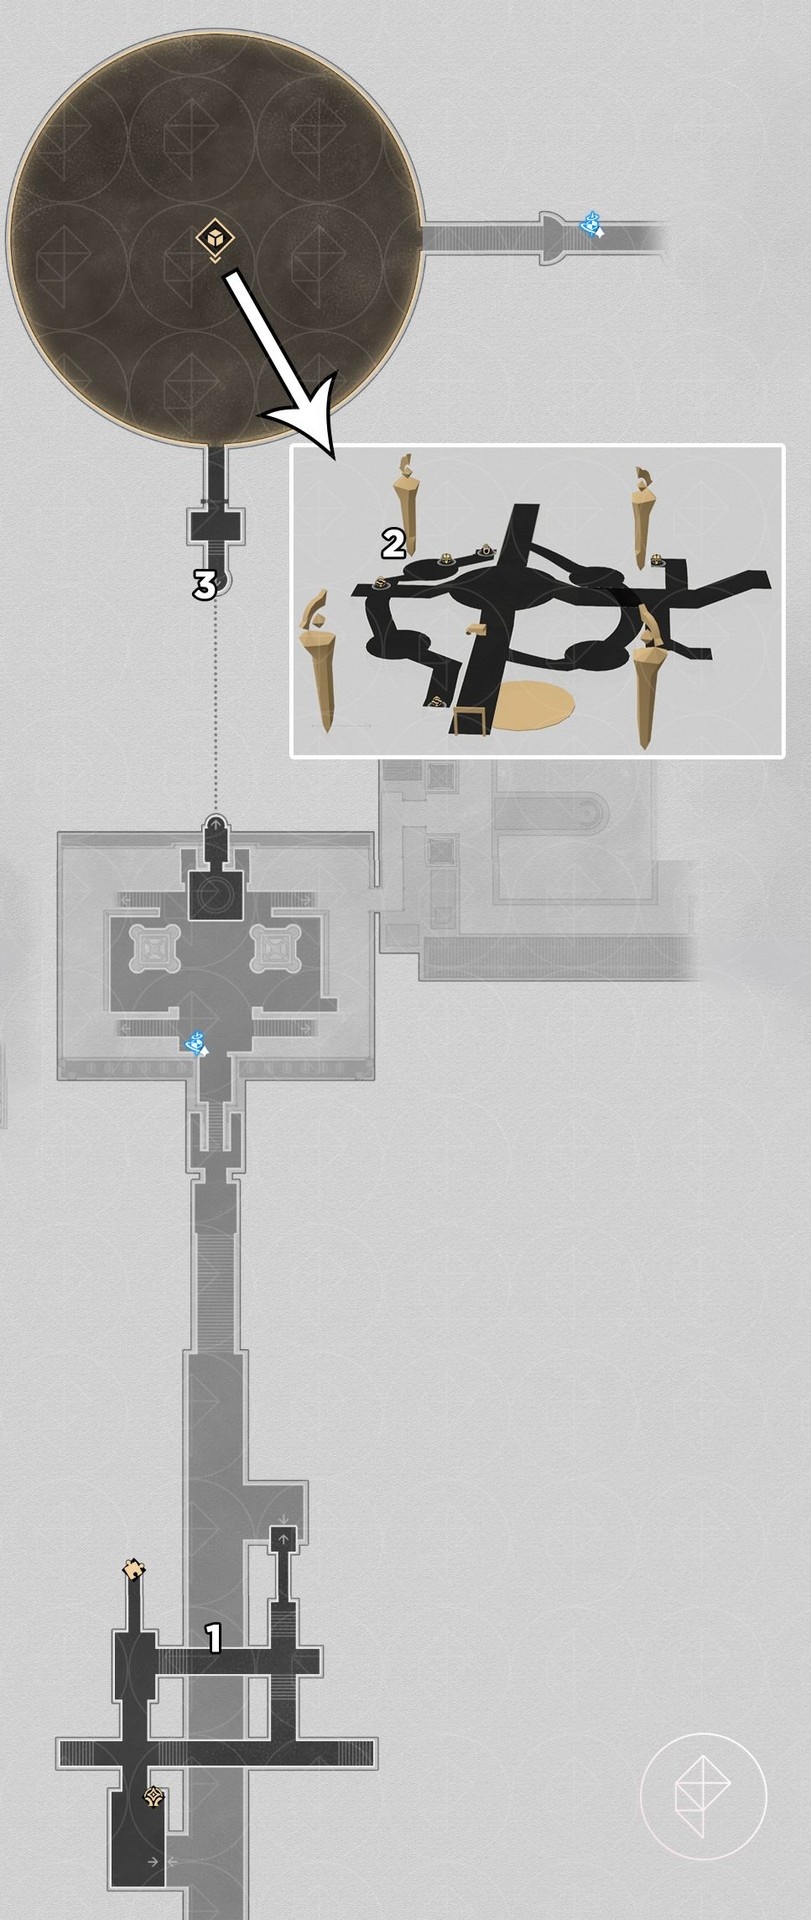
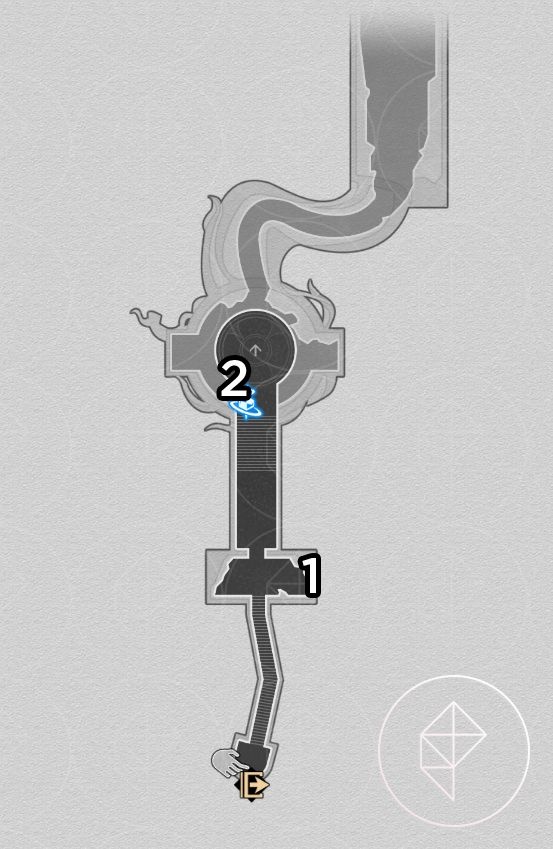
‘Strife Ruins’ Castrum Kremnos nymph locations
Strife Ruins also has 20 nymphs, this time as blue beetles. You get Stellar Jade, Celestial Ambrosia, and the key item “Portentous Goldwoven: Strife Ruins.” After collecting them all, go to the Kremnos Arena on F2 and walk into the arena area to trigger a question — answer “13 flames” to get the chest and the achievement “Chirping Secret: Fleetfoot Paradox.”
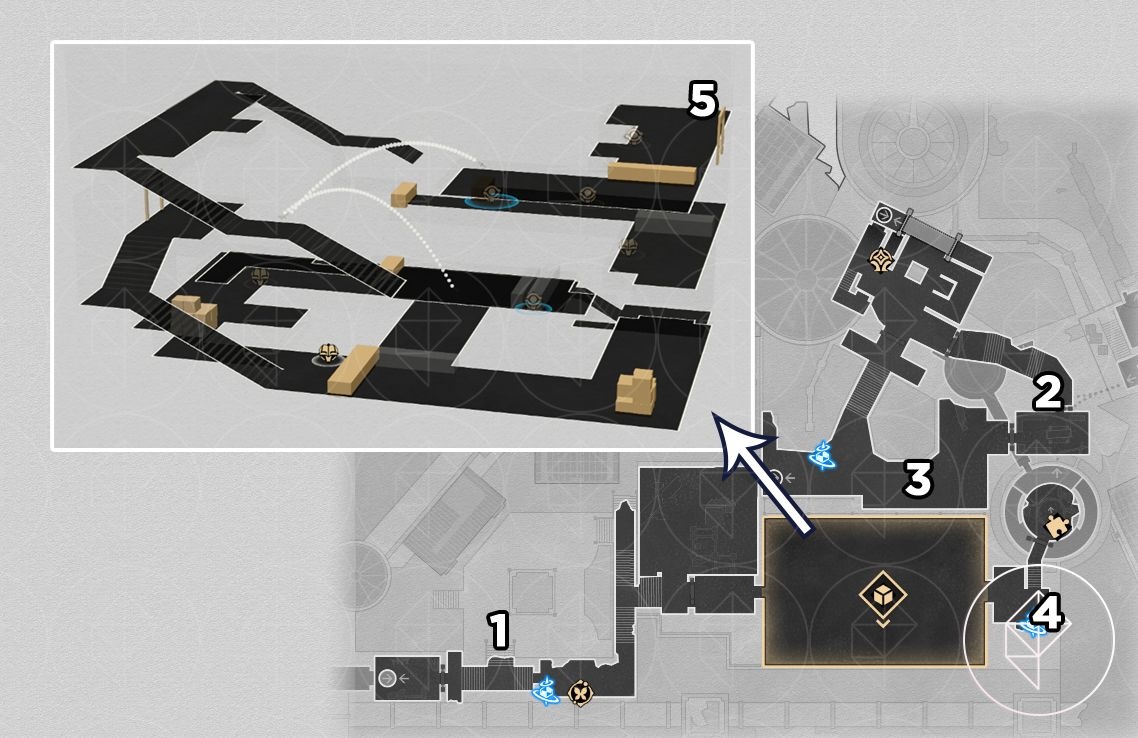
Strife Ruins F3
- On the wall.
Strife Ruins F2
- In a pile of boxes.
- Attack the shields on the wall to reveal one.
- On the railing.
- On the edge of the structure and on the lip of a bowl-like decor.
- On the mural.
Strife Ruins F1
- On the wall carving.
- Near rubble.
- Overlooking the chain bridge.
- On the sword in the base.
- On the floor.
- Very high on a light fixture — use the hand mechanism.
- At the top of the center structure.
- Next to the space anchor.
Strife Ruins B1
- In the fire.
- On the door.
- On the floor and on a blue light fixture.
- On a round structure — use the hand mechanism.
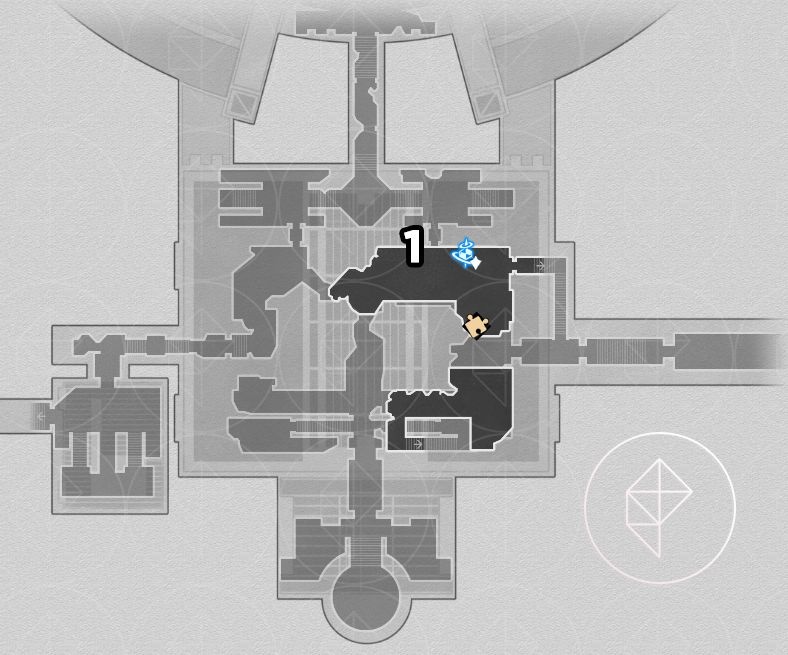
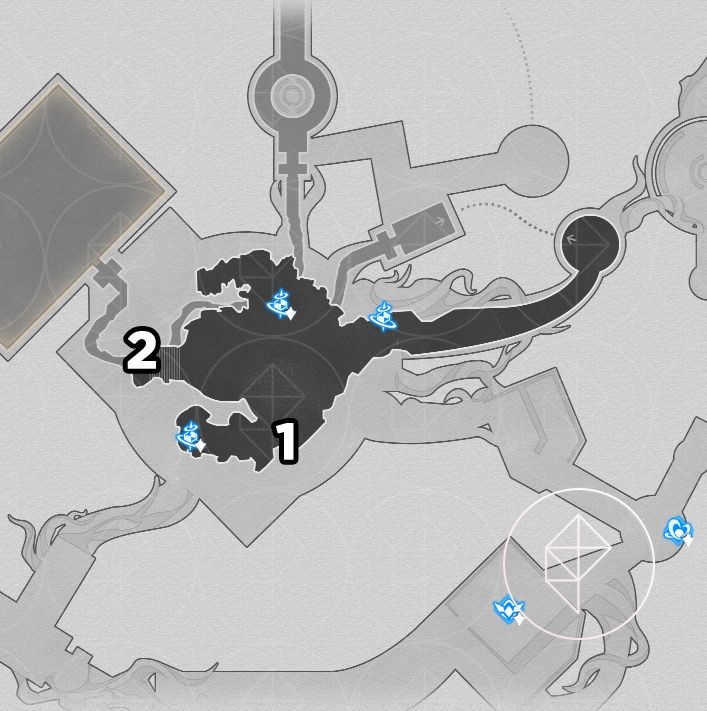
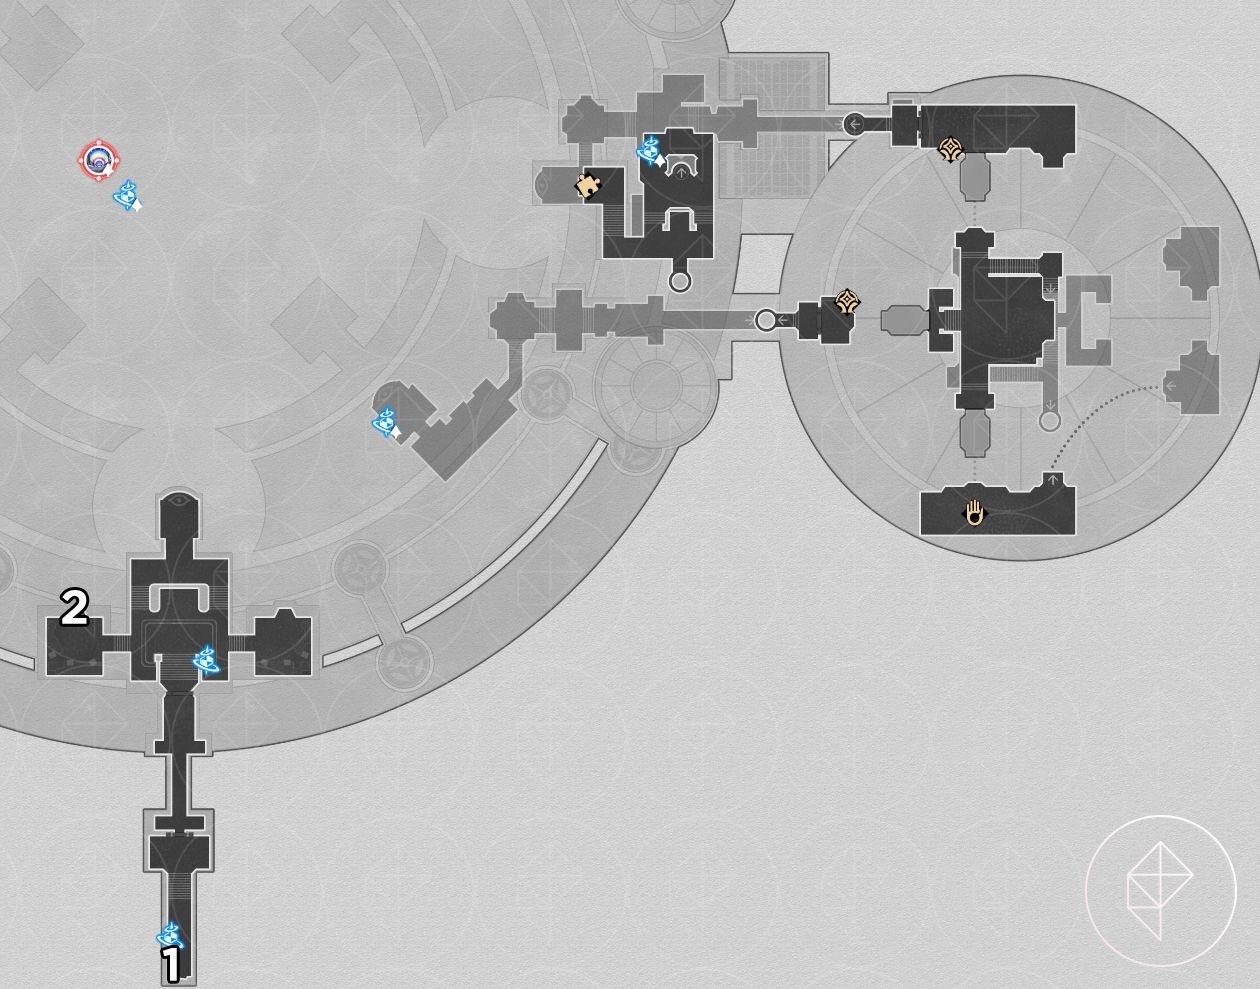
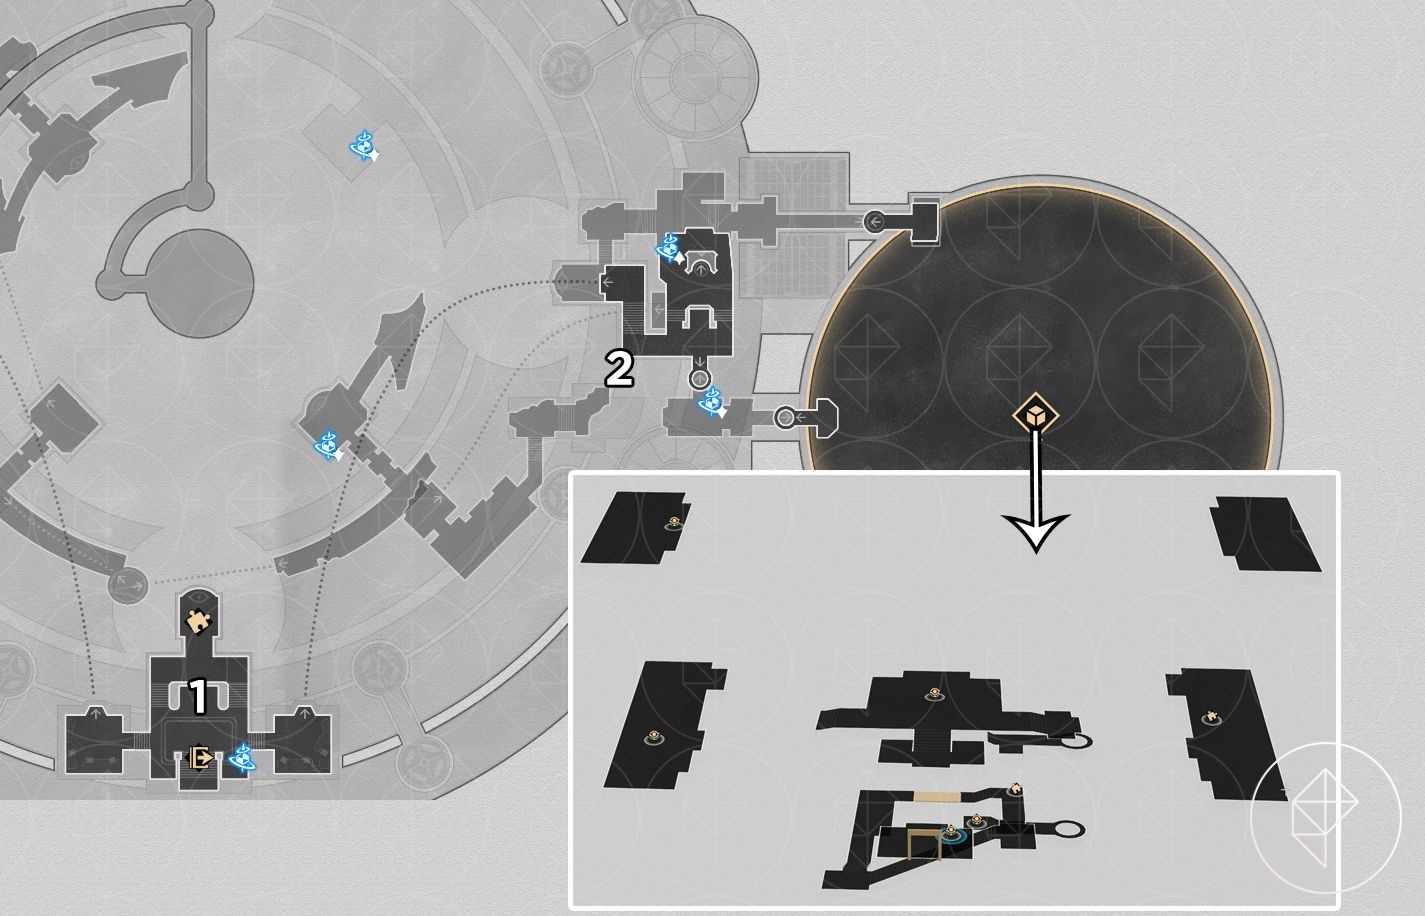
‘Abyss of Fire’ Janusopolis nymph locations
10 teal beetles live in Abyss of Fire. Collecting them grants Stellar Jade, Celestial Ambrosia, and the “Portentous Goldwoven: Abyss of Fate” item. That item gives a hint that completes a fourth of a tablet puzzle on Janusopolis F2; solving the “Crrk?” prophecy tablet in the southeast opens a precious chest and gives the achievement “Chirping Secret: Many-Faced.”
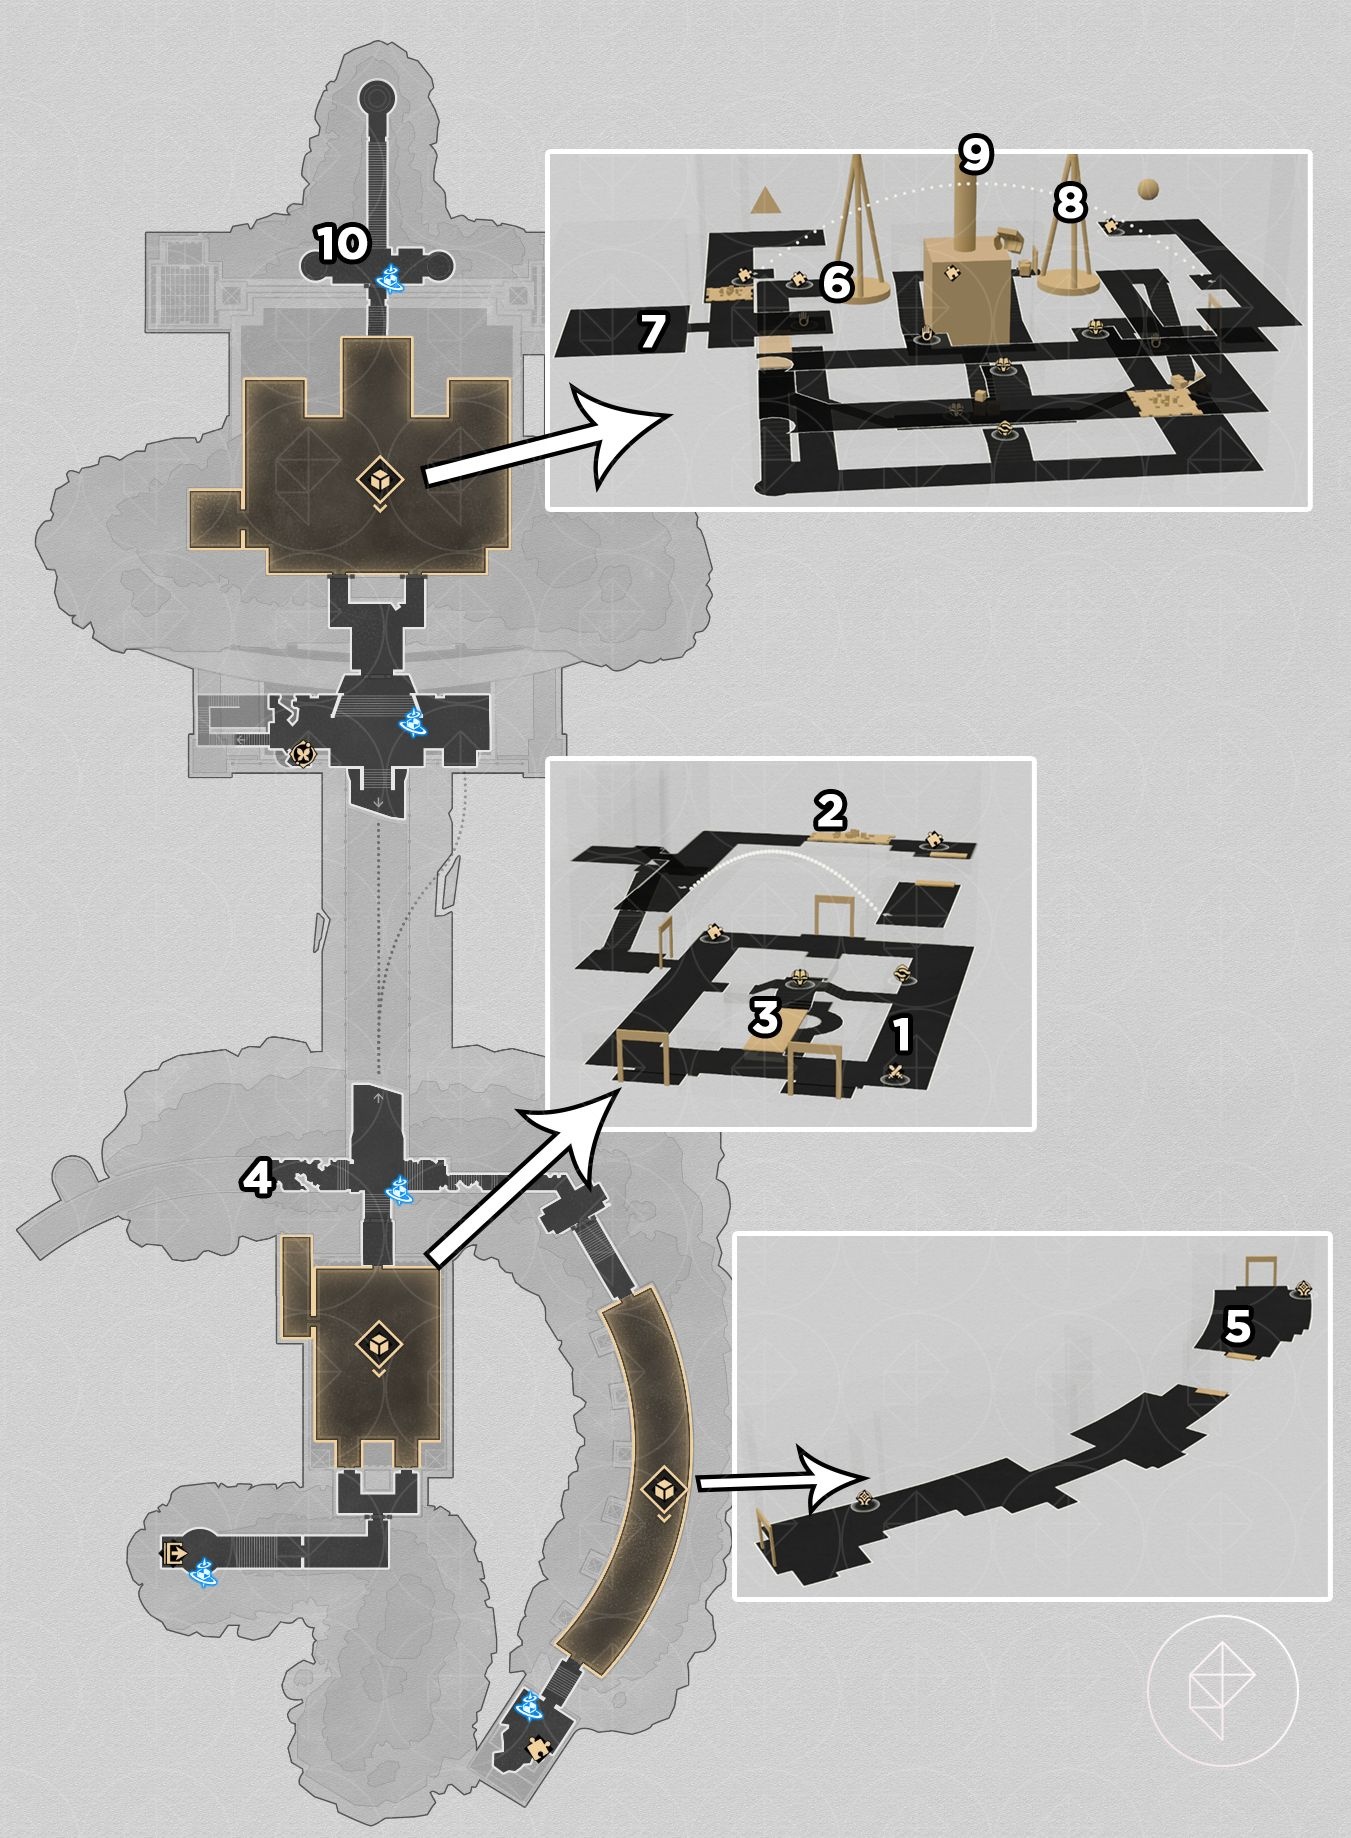
Janusopolis F2
- On the broken pillar (evernight).
- On the wall (evernight).
- On the bridge (dawn).
- On the edge of the path.
- Under the pillar on the ground.
- On the left scale (dawn).
- On the floor (dawn).
- In a back compartment behind the right scale on the third floor (dawn).
- On the top of the center part of the scales — use the hand mechanism.
- In the hood of the tall statue.
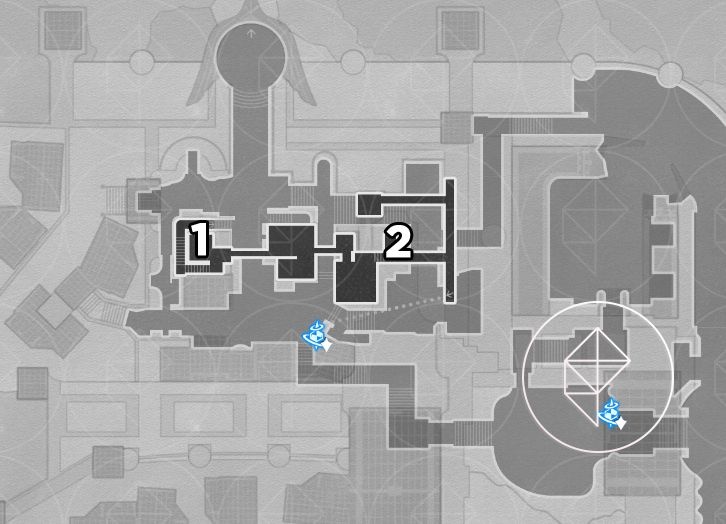
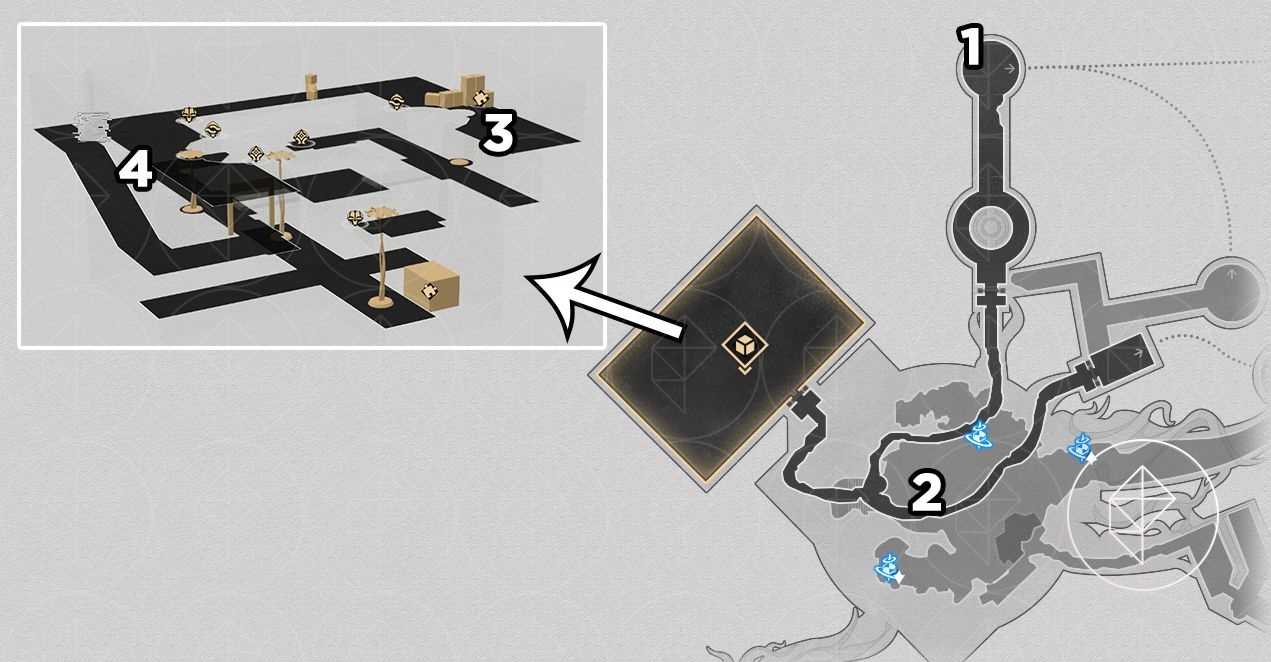
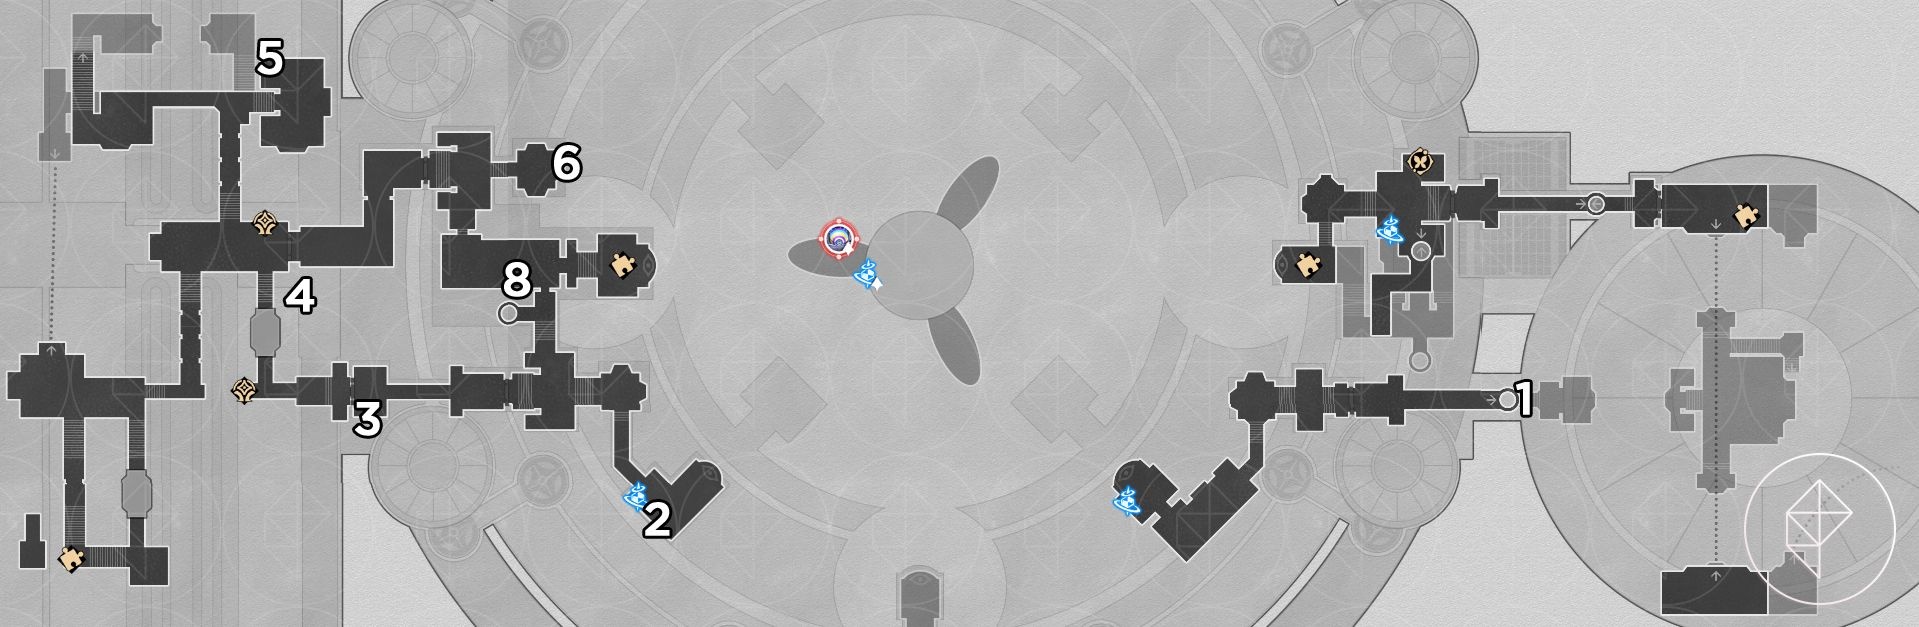
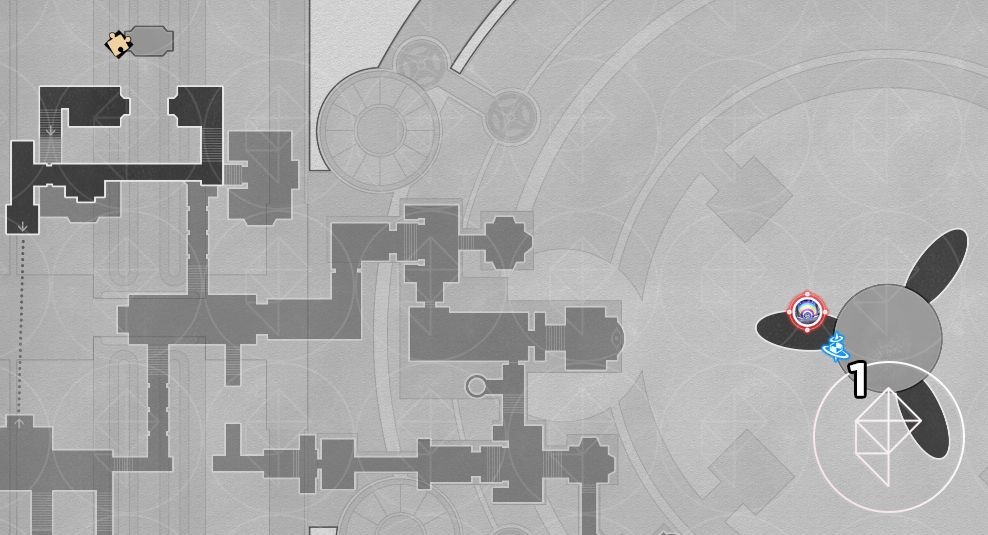
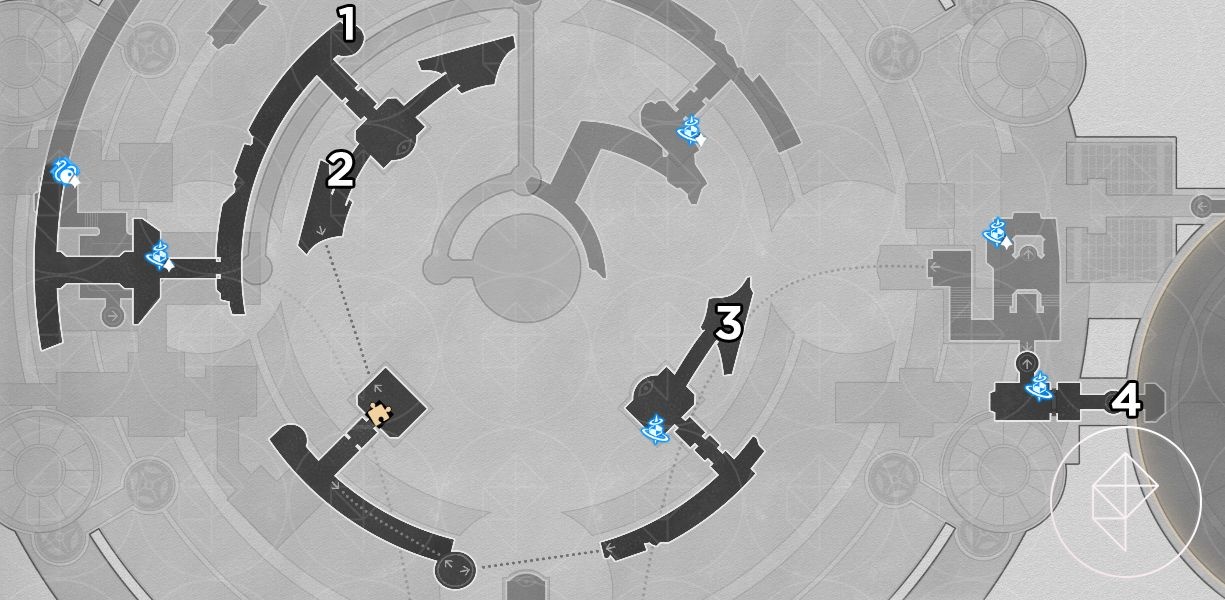
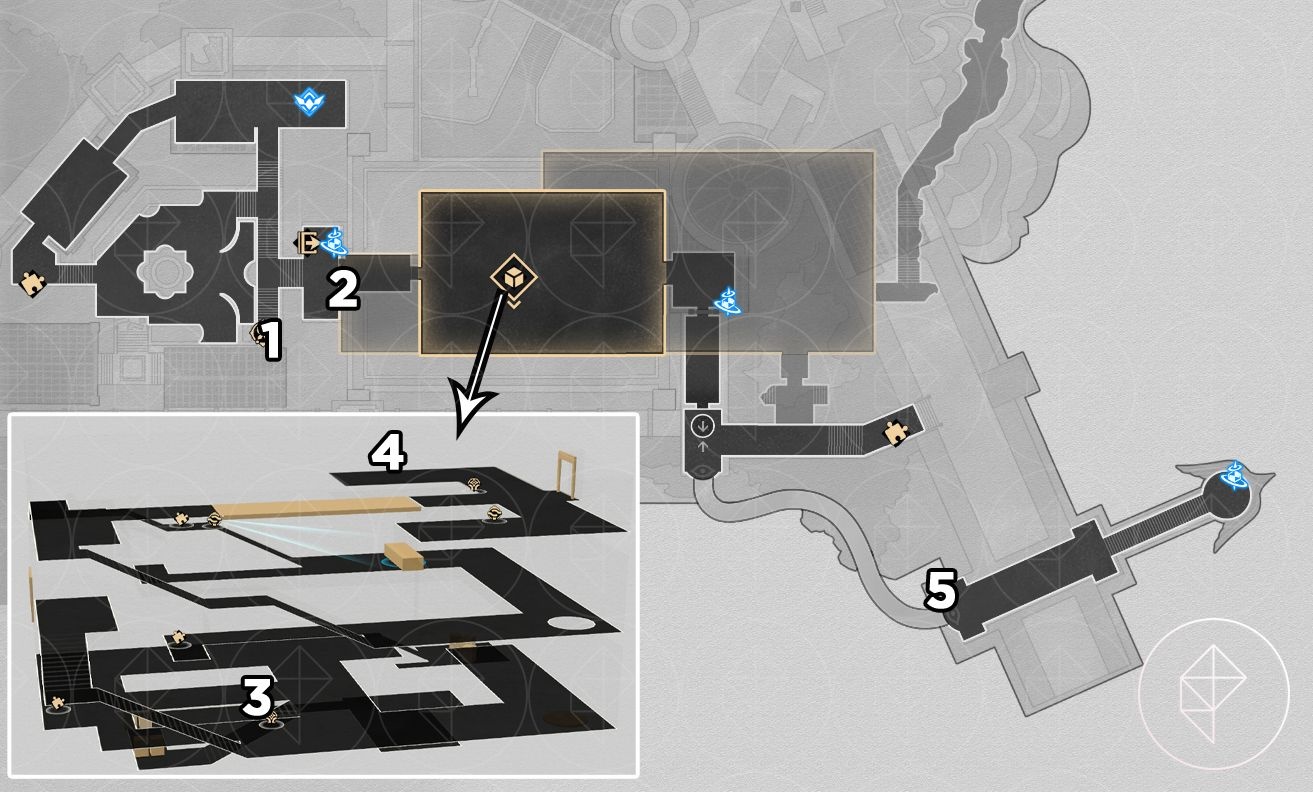
‘Sanctum of Prophecy’ Janusopolis nymph locations
Sanctum of Prophecy holds 10 orange-and-blue nymphs. You’ll receive Stellar Jade, Celestial Ambrosia, and the key item “Portentous Goldwoven: Sanctum of Prophecy.” The post-collection puzzle uses the giant hand on B2 to drive it through circles that represent pi to the seventh digit — complete it for a chest and the achievement “Chirping Secret: Law of Passage.” For a visual solution, see the video linked below.
Sanctum of Prophecy F1
- On the edge overlooking the sky.
- On the light holder in the back (dawn).
- Sitting on a chair (dawn).
- Hanging from the tapestry.
- Looking at the calyx.
- On the curtain at the top of the room (dawn).
Sanctum of Prophecy B1
- On the floor looking at the scrolls.
Sanctum of Prophecy B2
- In front of the ram head puzzle.
- High up on part of the bridge — use the giant hand to float up.
Sanctum of Prophecy B3
- On the table.
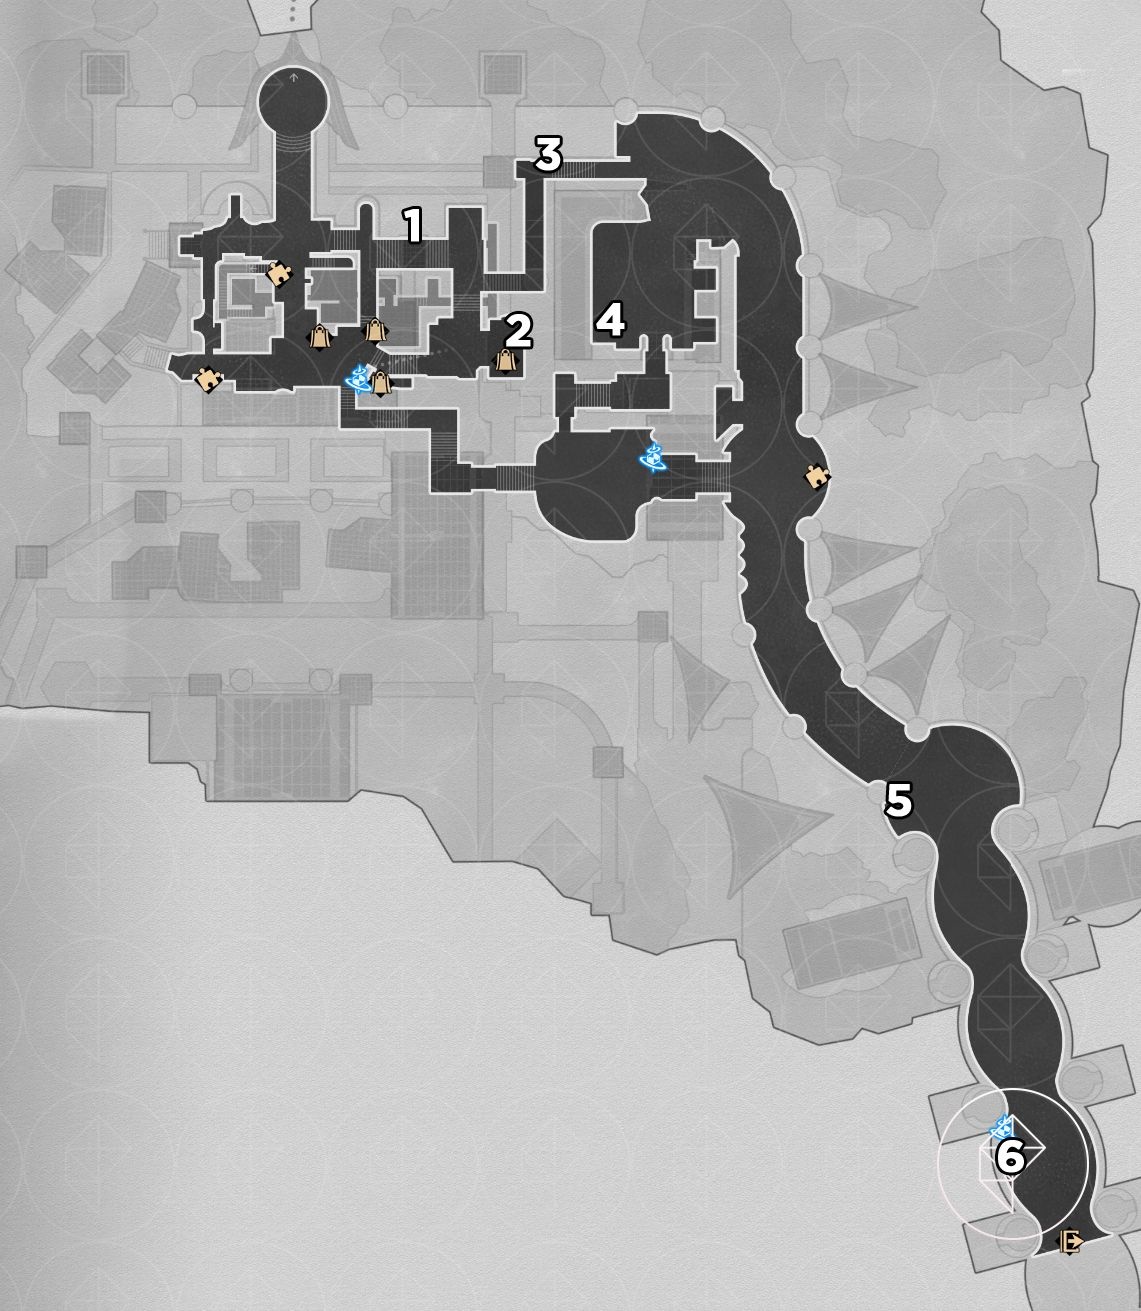
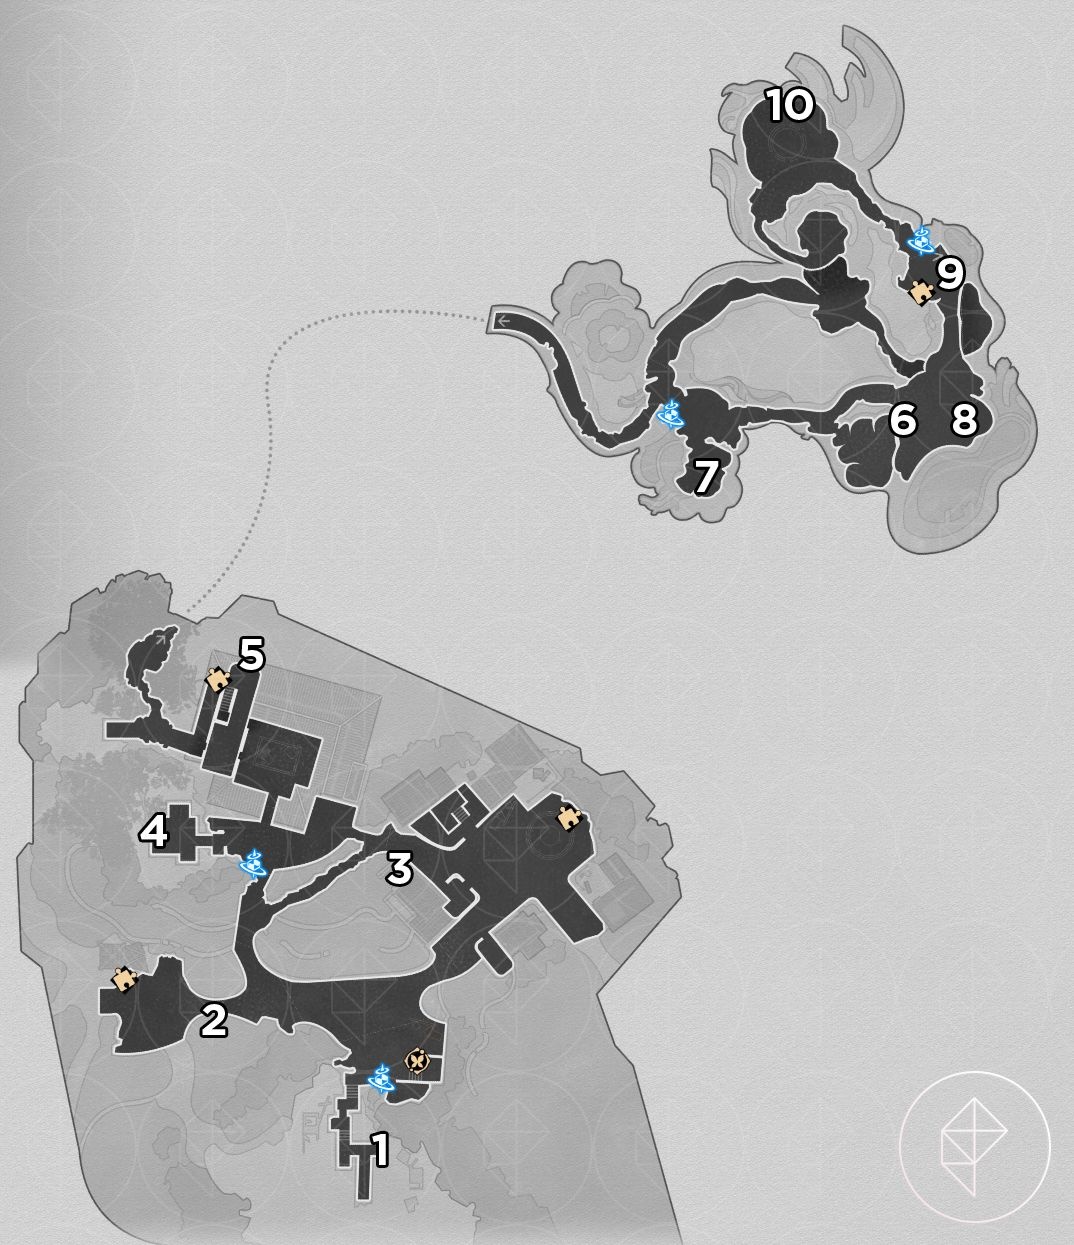
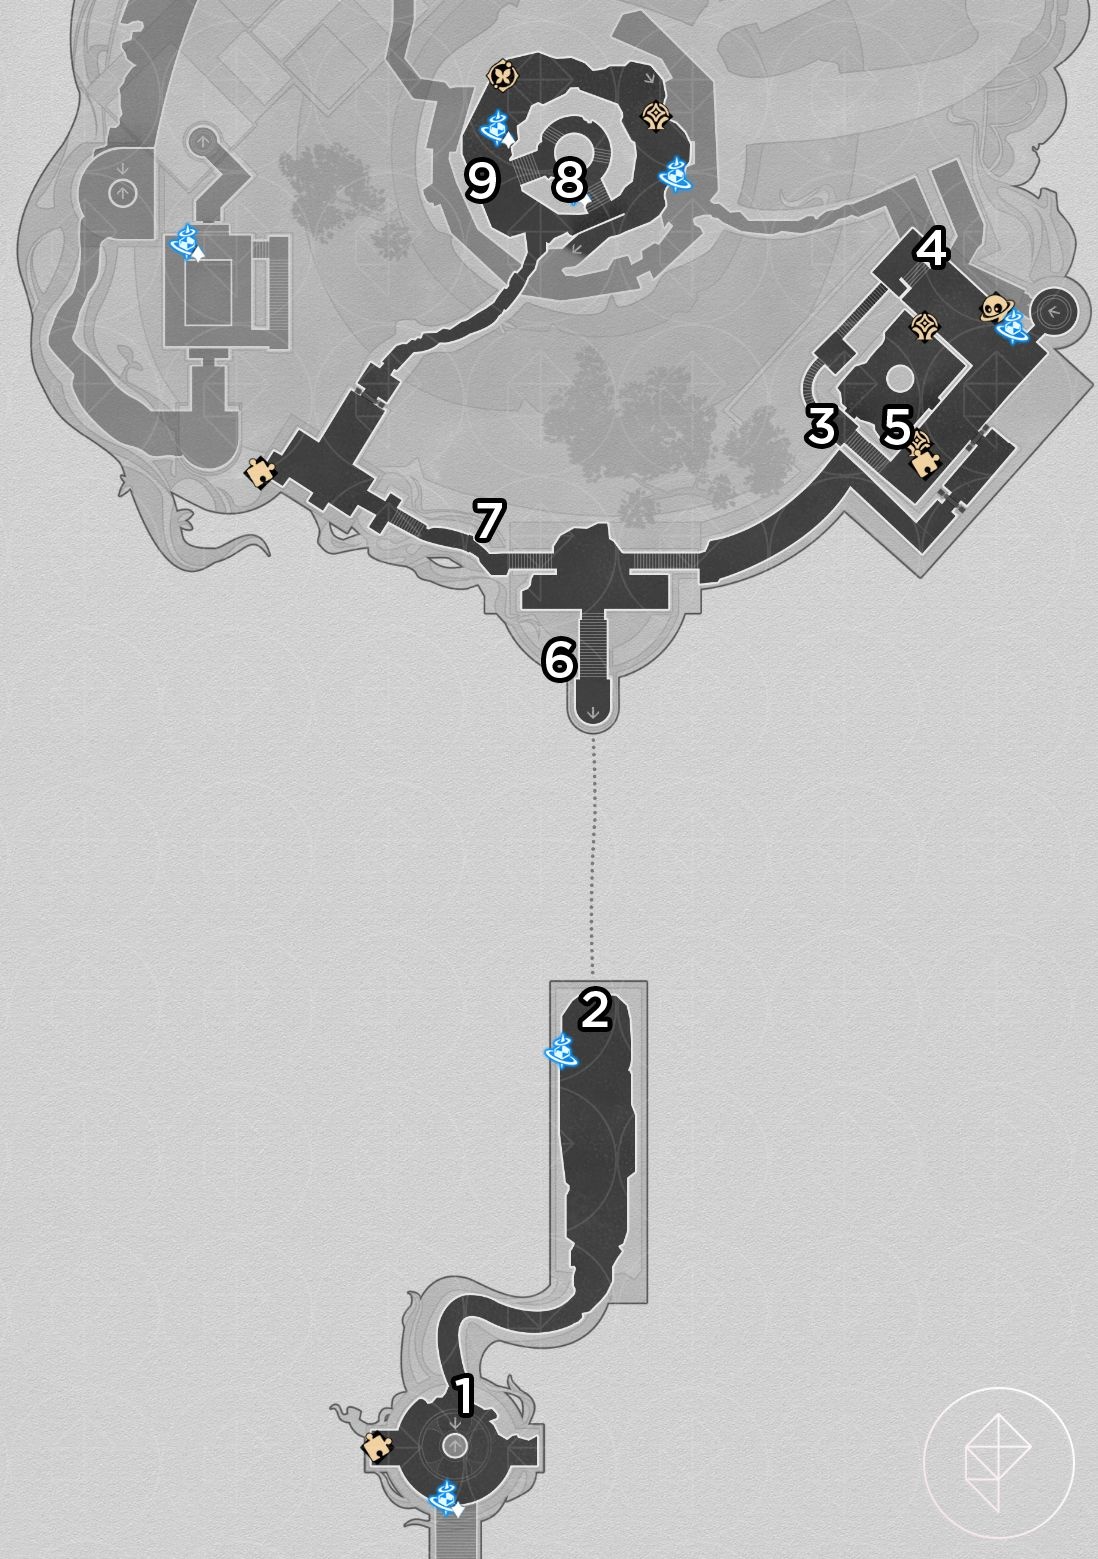
‘Murmuring Woods’ Grove of Epiphany nymph locations
Grove of Epiphany contains 20 green beetle nymphs. You get Stellar Jade, Celestial Ambrosia, and the “Portentous Goldwoven: Murmuring Woods” item. That key item unlocks a statue-based puzzle; after setting the sages correctly you can return to the “Garmentmaker” for a chest and the achievement “Chirping Secret: Lattice of Wisdom.” For a step-by-step, the guide below is helpful.
Grove of Epiphany F4
- Looking at the mural.
- On the side of the throne.
Grove of Epiphany F3
- On the orange growth coming out of the wood.
- On the wood near the butterflies.
- On the topmost floor in the flowers (evernight).
- On the wall by the stairs (dawn).
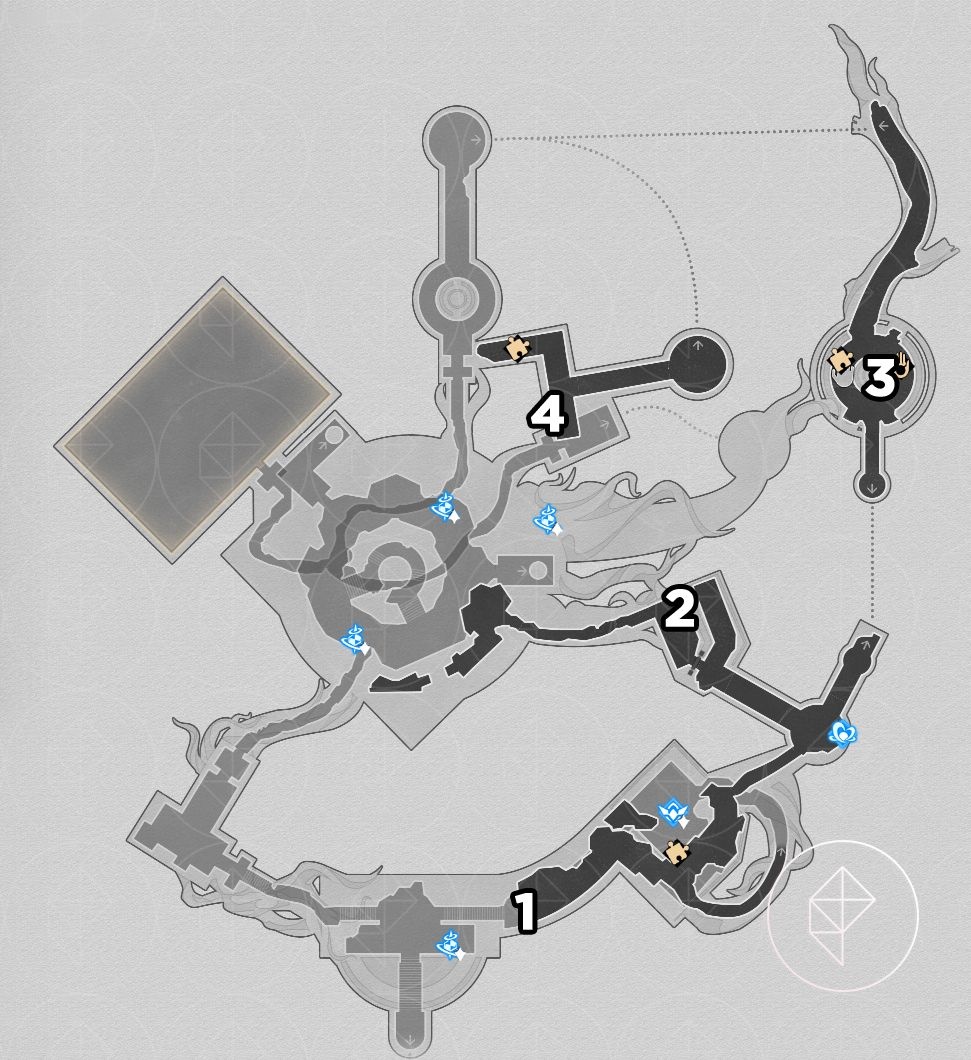
Grove of Epiphany F2
- On the edge of the walkway.
- Inside a building on the window.
- In the pond.
- On the wall.
Grove of Epiphany F1
- In the lap of the statue.
- Next to the floating scroll.
- On the outer edge of the structure.
- On the center tree cocoon.
- On the railing.
- On the ground by the tree roots.
- On the water wheel — wait for the platform to rotate into place.
- On the edge of the fountain.
- On the wall.
Grove of Epiphany B1
- On the edge of the pool of water (evernight).
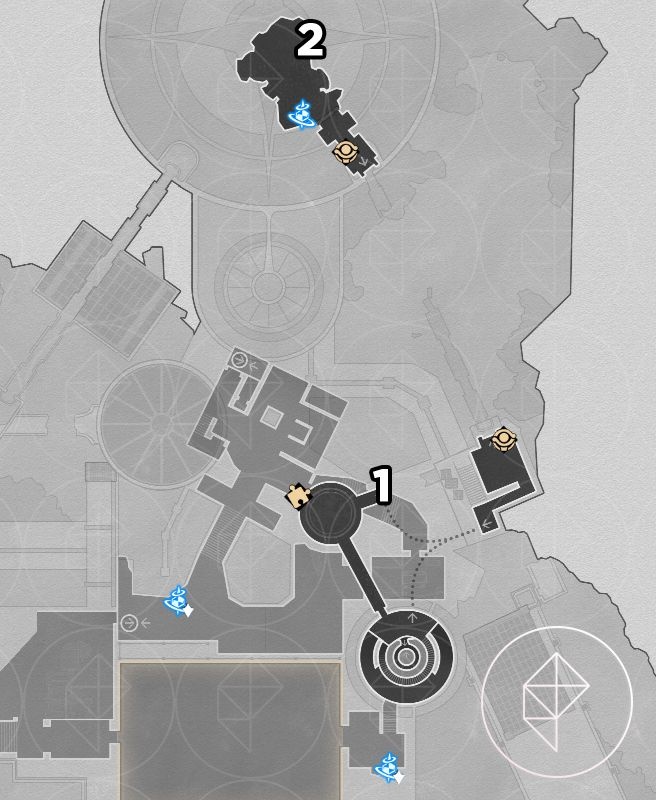
‘Demigod Council’ Dawncloud nymph locations
This map includes 10 red butterflies. You’ll receive Stellar Jade and Celestial Ambrosia, but no key item. Instead, the melody played by collected nymphs at the “Garmentmaker” matters: you must interact with points on the map to “offer greetings to Kephale” and spawn a special treasure. Completing this yields the achievement “Chirping Secret: Path of Pilgrimage.” For a full run-through, watch the linked video below.

- Above the fire.
- In the center of the mural.
- On the tip of the vessel.
- Riding on the nose of a flying pig speed vessel — use a ranged character when it passes.
- On the column.
- High on the cliff on the bird mural’s head — requires the giant hand.
- On the trees.
- On a broken stone arch — requires the giant hand.
- On the chimes.
- Low on the waterfall — requires the giant hand.
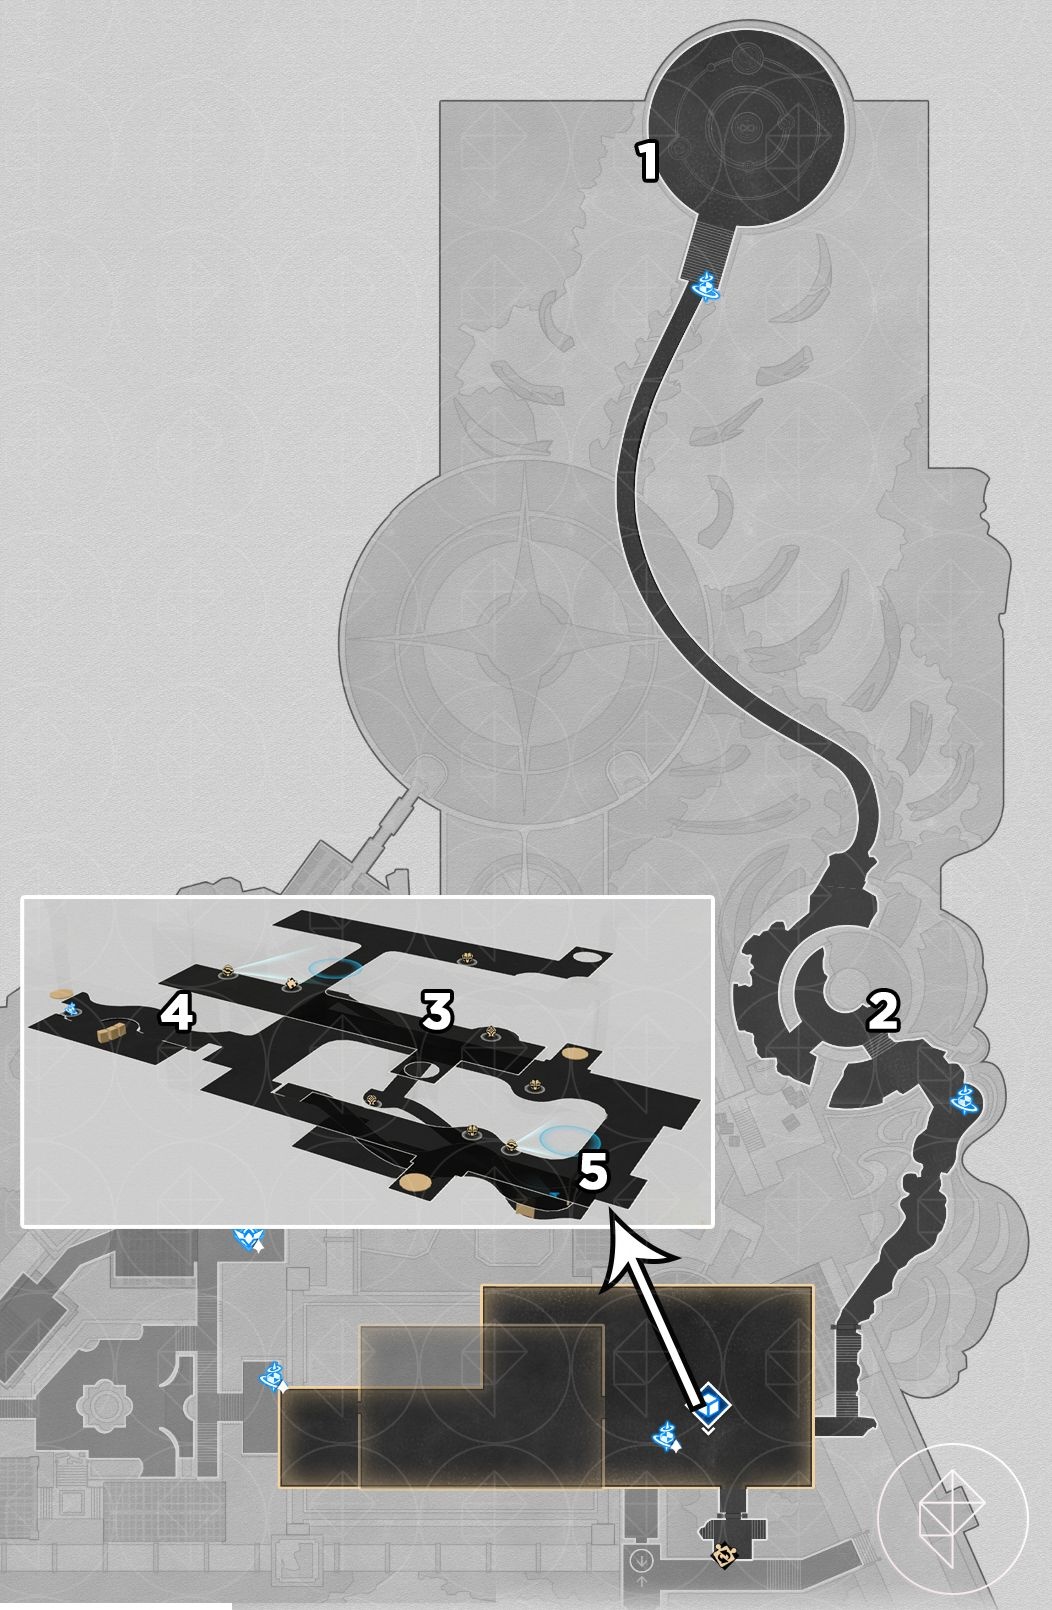
‘Dragonbone City’ Styxia nymph locations
Dragonbone City has 10 pale blue firefly-like nymphs. Collect them for Stellar Jade, Celestial Ambrosia, and the key item “Portentous Goldwoven: Dragonbone City.” That key item hints at a stone-ball puzzle on F2; solving it opens a chest and grants the achievement “Chirping Secret: Lost Prayers.” See the video below for the full puzzle solution.
Dragonbone City F1
- Floating over the railing.
- On the edge of the walkway — requires rune to shift area to day.
- Atop a platform near the water — also requires day rune.
Dragonbone City F2
- On a flying pig speed vessel — stand where the marker is and use a ranged attack as it passes.
- By a fallen pot near the door.
- Floating along the path.
- Floating over the railing — hit with ranged attacks multiple times to catch it.
- Looking at scrolls on a shelf.
Dragonbone City F3
- On top of a floating scroll.
- Flying by some debris.
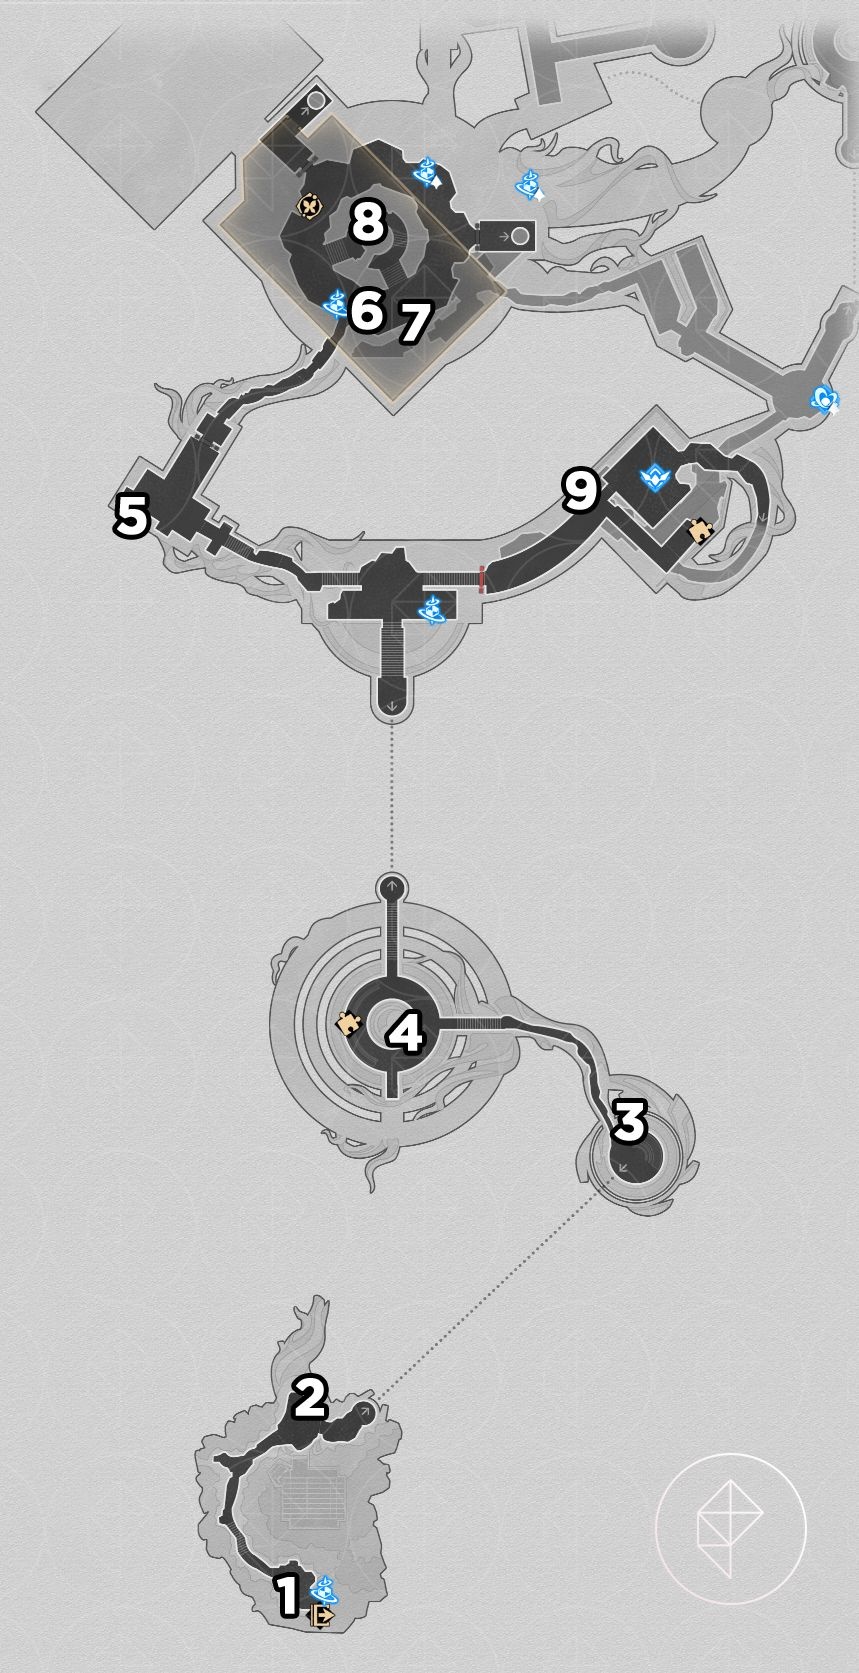
‘Fortress of Dome’ / ‘Cloudedge Bastion Ruins’ Eye of Twilight nymph locations
Eye of Twilight (Fortress of Dome) has 10 turtle-like beetle nymphs; Cloudedge Bastion Ruins includes 20 purple/blue versions. Rewards are Stellar Jade and Celestial Ambrosia, plus area key items. After collection, each area has its own puzzle: use the giant hand in Fortress of Dome to punch large nymphs for a special chest, and in Cloudedge solve a compass puzzle to get another chest. Watch the linked videos for solutions.
Fortress of Dome — F1
- On debris floating above a crack.
- On the edge of the platform.
Fortress of Dome — F2
- On the wall in front of the elevator.
- Among shelved balls.
- On a wall fixture.
- On a pillar — ride the platform toward the fan to reach it.
- On a tall corner structure.
- On the edge of the platform.
- On the mural — it moves as you switch mural-to-mural.
Fortress of Dome — F3
- On a golden orb along the edge of the platform.

Cloudedge Bastion Ruins — F1
- Sitting on debris (may be kidnapped by a Spirithief).
- In the gold waterfall fixture.
- In the river of golden liquid.
- On a pillar.
Cloudedge Bastion Ruins — F2
- Under rubble.
- On the side of the bridge.
- On the ceiling.
- On the wall in front of the elevator.
Cloudedge Bastion Ruins — F3
- Atop a large console.
- On a pillar-like structure.
Cloudedge Bastion Ruins — F4
- On the center-most platform — reach it using the compass tool.
‘Aedes Elysiae’ nymph locations
Added in version 3.4, Aedes Elysiae has 10 pink winged beetles. Find all and you get Stellar Jade, “Portentous Goldwoven: Aedes Elysiae” and Disorder Ambrosia. The bonus chest requires circling the northern harp three times and then hitting bells in order — see the video below for the bell sequence.
- Flying above the dock.
- On top of the scarecrow.
- Among piles of hay.
- At roots of the big tree.
- Attached to a flying pig — use a ranged attack when it passes.
- Hidden in dirt on the lower map — interact with sparkles to reveal it.
- On the table.
- On the porch of a tiny house.
- Flying by stacked stones.
- Flying by mural rocks.
‘Warbling Shores’ Styxia nymph locations
Warbling Shores contains 10 yellow flying beetles. Collect them for Stellar Jade and Disorder Ambrosia. A maze puzzle at the bottom of a pool hints at a hidden chest — draining the pool and solving the maze yields a reward and the achievement “Chirping Secret: Unfinished Business.” Video guidance is below.
Warbling Shores F1
- Behind the Revelry Garmentmaker, looking at the wall.
- Over broken vases in a lift room reached by walking east from the western fountain square.
- On the bottom-most floor of the 3D room near four artifacts.
- On the top-most floor of the 3D room near a harp-like structure.
- Floating over an edge looking at the rainbow bridge.
Warbling Shores B1
- On the edge of a platform.
- Floating among rubble in a passageway.
- On the middle floor, looking out the 3D room window (dawn).
- Floating in water near the space anchor (evernight).
- On the very bottom of the pool — the water must be drained (dawn).
‘Radiant Scarwood’ Grove of Epiphany nymph locations
Radiant Scarwood features 20 pale blue-green beetles. Rewards include Stellar Jade, Disorder Ambrosia, and the key item “Portentous Goldwoven: Radiant Scarwood.” The area puzzle uses Bartholos to clog water ducts and then interact with floating masks/objects to create an infinity sign — succeed and you get a chest and the achievement “Chirping Secret: Wisdom in Confinement.”
Radiant Scarwood B1
- On the edge of some ruins.
- On the rail next to the space anchor.
Radiant Scarwood F1
Note: for entries #3–5 below you must use Bartholos to clog water ducts and drain the room to access lower floors.
- On the wall above the tunnel entrance.
- On a hidden passage.
- On the wall above stairs to a lower level.
- On a box on the lower level ceiling.
- In the corner of the lower level on a wooden crate.
- In the water next to the stairs.
- On a twisted tree root.
- On the edge of the water reservoir.
- Looking at the broken water wheel.
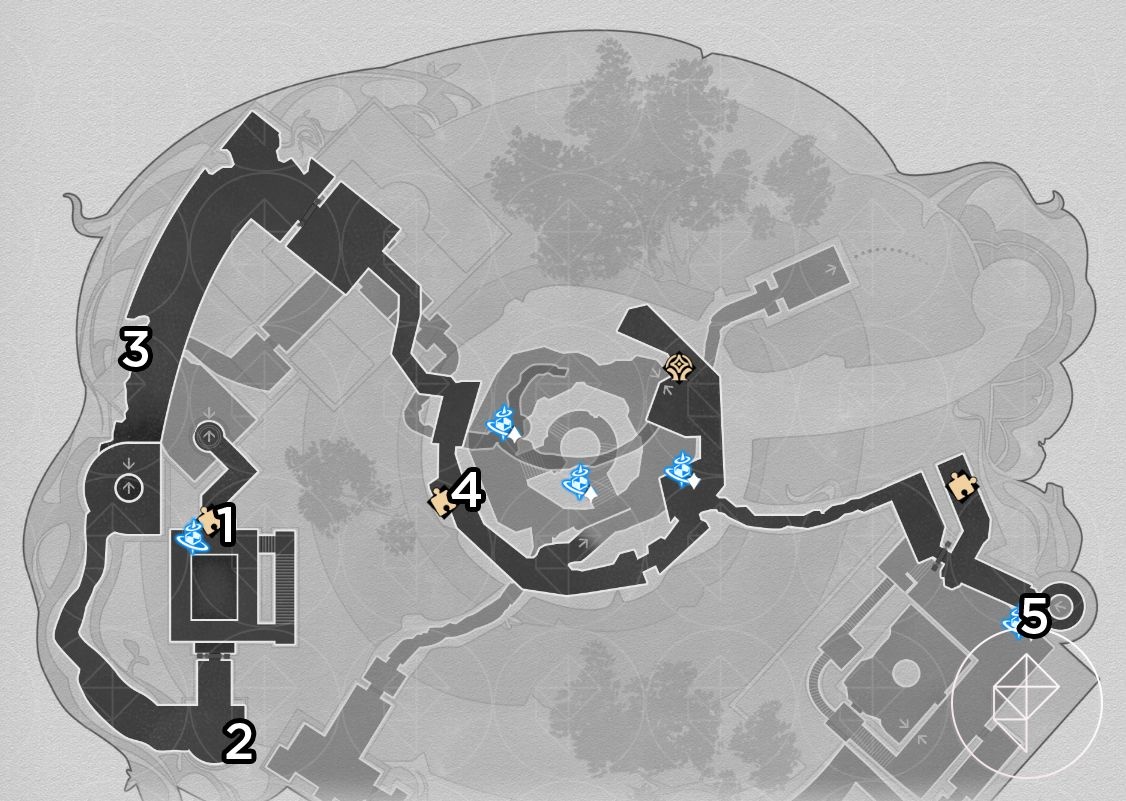
Radiant Scarwood F2
- On a table on the upper level.
- On the rails overlooking a chasm.
- On a twisting tree branch.
- On the edge of the walkway.
- On a small pillar.
Radiant Scarwood F3
- On an edge of the tree-branch walkway.
- On top of a box on the upper level — use Bartholos to fly up.
Radiant Scarwood F4
- On the ground near a winding tree branch.
- On the ground observing a glowing golden figure.
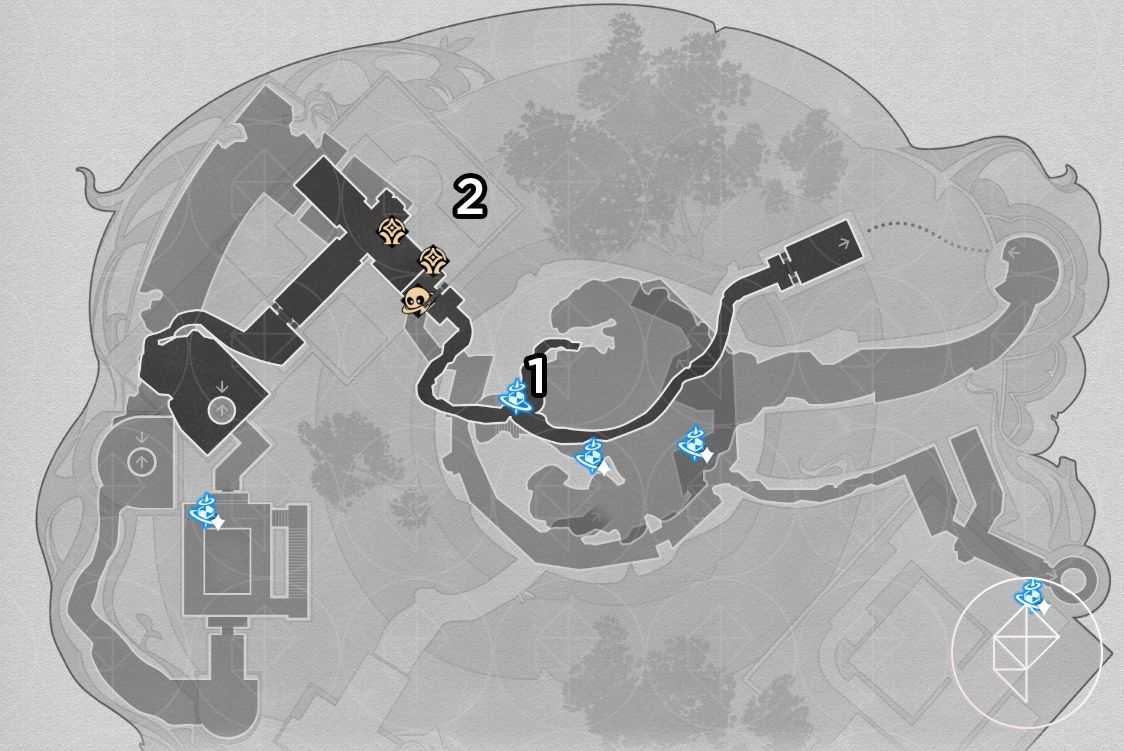
‘Universal Matrix’ Great Tomb of the Nameless Titan nymph locations
The Universal Matrix holds 10 round orange-red beetles. Collect them for Stellar Jade, Disorder Ambrosia, and “Portentous Goldwoven: Universal Matrix.” The puzzle uses the Hand of Zagreus to punch squares until the right symbols appear; solve it to get a chest and the achievement “Chirping Secret: The System of Four.” A visual solution is linked below.
Universal Matrix F1
- On the wall in the room behind the space anchor.
- On top of a tall structure next to the pathway.
- Sitting on a circuit board off the path.
- On a ledge by a waterfall with enemies nearby.
Universal Matrix F2
- On the wall behind the giant hand — out of bounds but still collectible.
- Looking at a mural on the wall (dawn).
- On the wall above three spinning masks (evernight).
- Upside down in the water.
- Off to the side on the floor.
- On the side of a platform behind a small structure.


